If for some reason you have a Raspberry Pi Zero (or Banana Pi M2 ZERO!) laying around and you’ve always thought “Wow, I wish I could turn this into a Raspberry Pi 3” then I’ve got cracking news for you.
In reality, you’re probably not thinking that but you may have wondered what your options are for adding USB ports and ethernet to your Pi Zero! Your main options will be a USB and Ethernet Pi Hat and what we’re going to look at today is the Raspberry Pi Zero to Pi 3 Adapter Board from September’s AliExpress Tech Haul.
Table of Contents
Specifications and Information
Whilst SpotPear does make a version with 4 USB ports and no ethernet, the model tested today sacrifices a USB port for the ethernet connectivity.
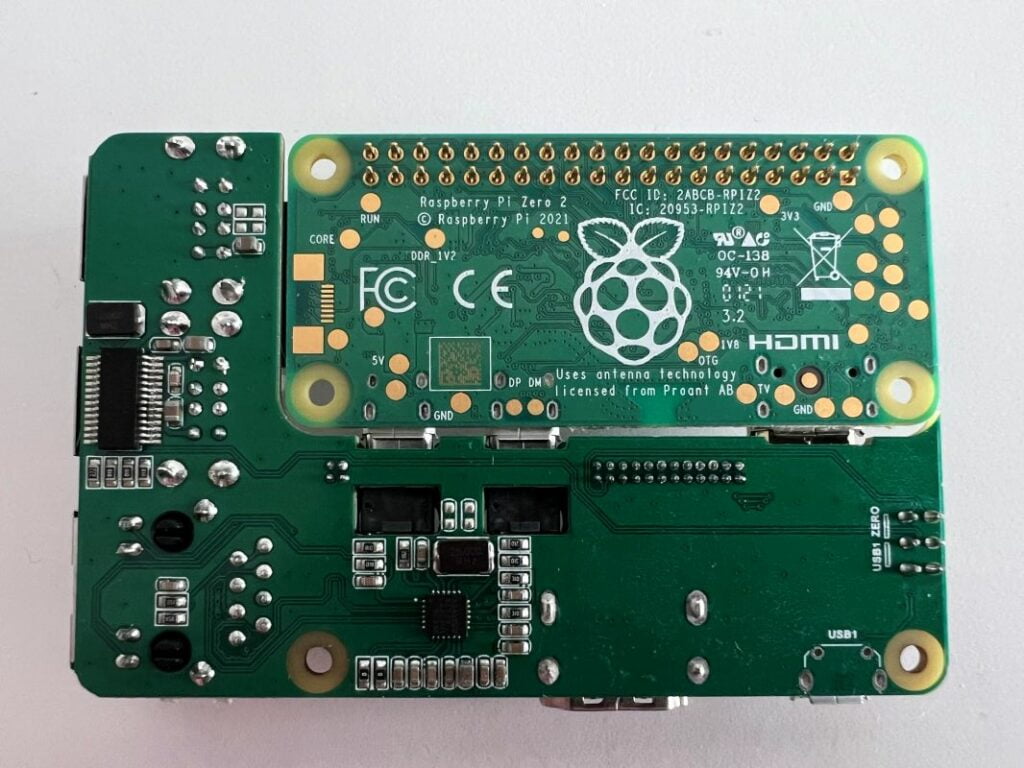
It’s also worth mentioning that it doesn’t quite offer the full I/O of a Raspberry Pi 3 as it lacks the 3.5mm audio and display/camera interfaces. Depending on the Pi Zero you put in though, you’ll be able to use its own interface for those. Clearance for that though will be a little tight (as you see in the picture) so you may want to double-check this before purchasing.
| USB | 3x 1.1/2.0 Ports |
| Ethernet | RTL8125B 10/100Mbit |
| HDMI | Full-size HDMI port (converted from mini-HDMI) |
| Power | Micro USB |
This is a screwless design, with the only “mounting” or way of securing your Raspberry Pi being the fact that the USB power, OTG and Mini HDMI are plugged in and boy, plugged in they are. Once pushed in, your board will be nice and snug and you won’t worry about it going anywhere if it’s pulled about. This is all well and good if you’re plugging it in and leaving it but as I tested multiple boards, I found it to be quite awkward to detach the SBC from the adapter board as a considerable force was required to dislodge it (which is a little painful and scary when you’re getting hold of the headers).
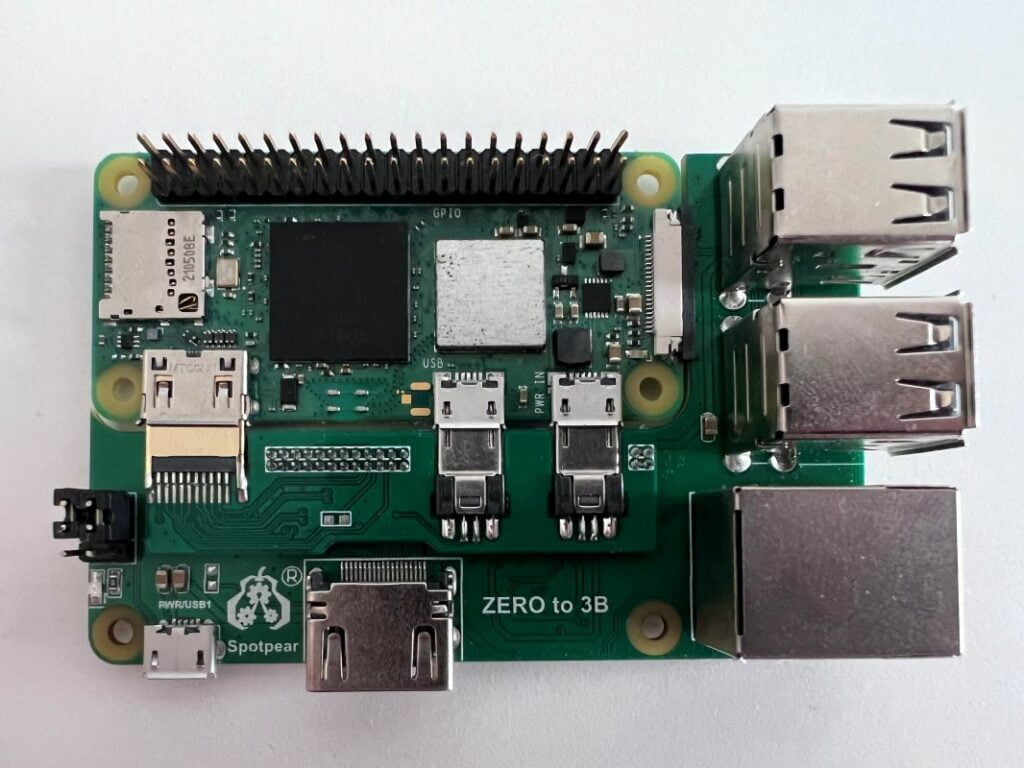
The price paid was $19.58USD (including 25% sales tax and shipping) so it’s not going to break the bank. Realistically, you’re not going to be paying much less for a USB hub and ethernet adapter if you go down that route (though you’re going to have to be OK with 100Mbit!)
Test Information
I’m going to run through network throughput using iperf3, USB SSD performance with fio and power draw in this piece as these are going to be the key data sets that I feel people buying this board will be interested in.
Pi 3 Adapter Ethernet Benchmarks
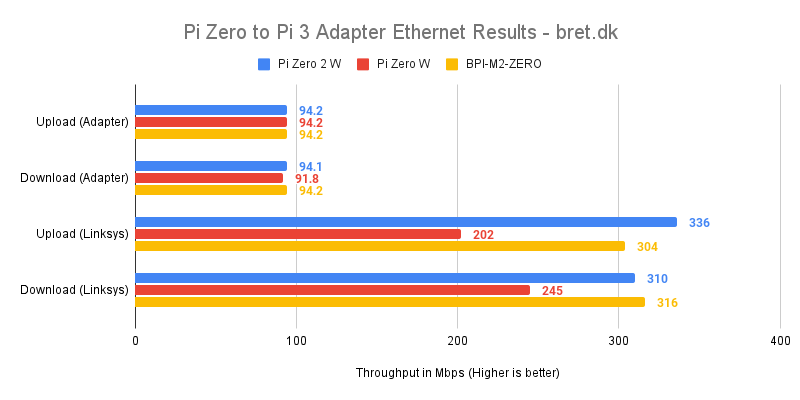
The ethernet port is what I’m expecting most people to be interested in here as it’s something all 3 of the tested Single Board Computers lack natively. It may only be 10/100Mbit but that’s still likely to be plenty for most use-cases. If you do need more than 100Mbit and you don’t need additional USB ports, you may be interested in comparing this to a USB-attached ethernet adapter, so that’s exactly what I’ve done below.
The Realtek chip (the description says it’s an RTL8125B) hits its theoretical maximums on all 3 boards, albeit with a slight dip in download speeds on the Pi Zero W so you’ll have no issues there. If network throughput is critical to your use case and USB ports aren’t required, the USB-attached ethernet route is what you’re going to want.
Pi 3 Adapter USB Benchmarks
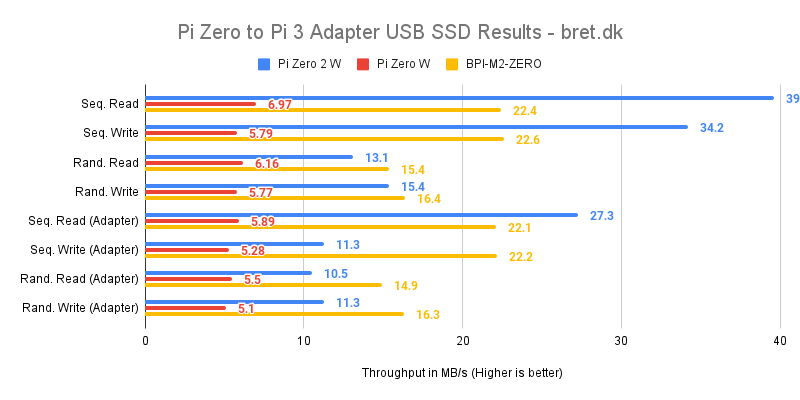
The USB ports on these boards run in USB 1.1/2.0 mode which is fine as the USB ports themselves on the SBCs tested are all USB 2.0, though the USB ports on the adapter’s hub are definitely slower than what you’ll find directly into the OTG port.
To test the USB throughput in a way that may interest buyers, I’ve used fio with a USB-attached Samsung EVO SSD and compared the data with what was obtained with the same SSD plugged directly into the OTG port.
You lose a decent chunk of performance on the Pi Zero 2 W (losing 22.9MB/s throughput in certain tests) which I expect really. With the Pi Zero W and BPI-M2 ZERO, however, the performance stays largely the same. If you’re interested in seeing how all 3 of these devices line up on their own, my Pi Zero Comparison is a good place to carry on from here!
Pi 3 Adapter Power Draw Data
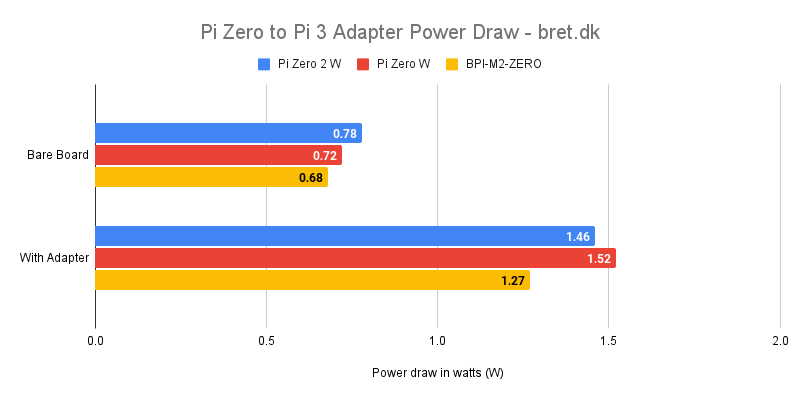
As we’re adding an ethernet and 3 USB ports along with everything else on the board itself, the power draw is naturally going to go up over the SBC on its own. For this final test, I’ve compared the idle power draw of each board on its own, versus the idle power draw of the board plugged into the adapter.
The values for the board on its own are just that, the board with nothing else connected and WiFi in use. For the board and adapter values, this is the board with WiFi enabled and an ethernet cable plugged in. The justification for this is that if you’re purchasing the ethernet-equipped version of this board, you’re going to be using it.
Things are roughly uniform across the board, with an increase in power draw between 0.59 and 0.8 watts and this is definitely something you’d want to take into account depending on how you’re powering this. One thing to note too, is if for some reason you choose to shut the attached Raspberry Pi Zero down and leave it attached and plugged in, the adapter board will continue to draw 0.5-0.6 watts.
What can I use a Pi 3 Adapter Board for?
You may have reached this point and wondered what you’d use a board like this for and that’s fine, I even questioned that myself. Much like the WaveShare USB/Ethernet hat I reviewed previously, it could be an option for those that have a Pi Zero sitting in a draw that needs a new lease of life. If you’re running Pi-Hole over WiFi currently (I won’t judge you) but want to try and make things more stable over ethernet, this could be the addon for you.
You may even be using USB hubs or HDMI adapters that are dangling off in an unsightly fashion, this adapter will let you neaten everything up. You could even repurpose a Raspberry Pi 3 case if you have one sat spare, though that seems like a rather niche situation..
Should you buy it?
If any of the above use-cases sound like something you want to do and you don’t want to spend too much money then sure, this could be a good option for you. Would I buy it myself though? Probably not. At this point, I would either look on eBay/local marketplaces to see if I could pick up an older Pi for not much more money, or I’d save a little more money and keep an eye on rpilocator for a Raspberry Pi 4 2GB model to pop up. It’s a nice little expansion board but you really need a reason to use this compared to its alternatives.