Table of Contents
Introduction
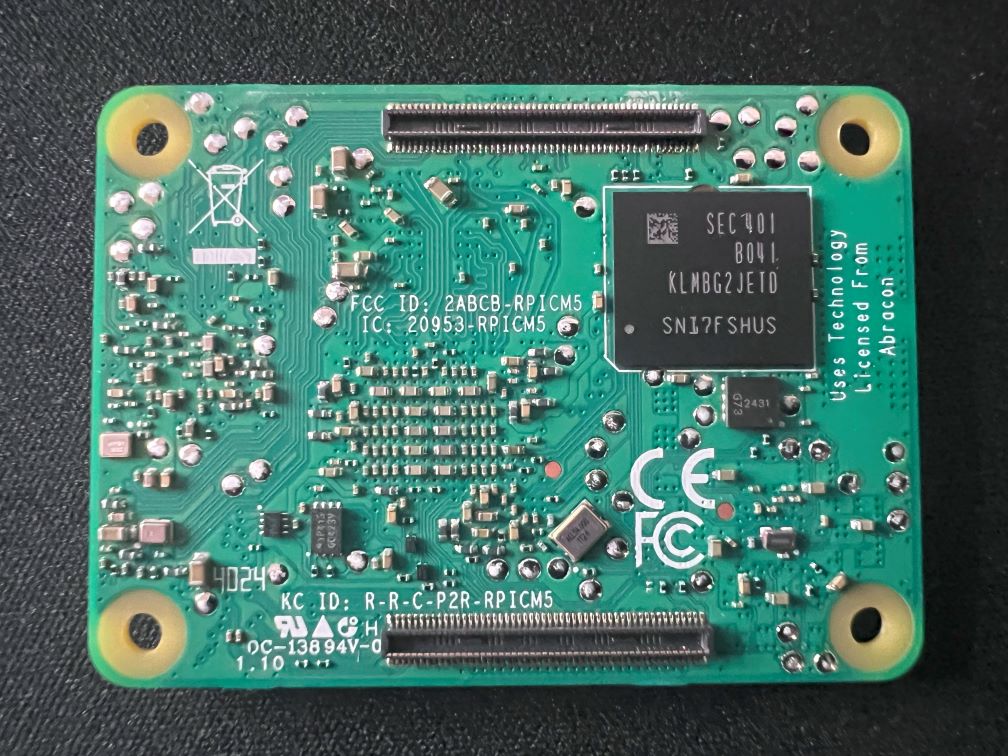
The Raspberry Pi Compute Module 5 has been hinted at and “coming soon” for what feels like an eternity now, with various mentions in GitHub commits/device trees, and, well, fewer official leaks.
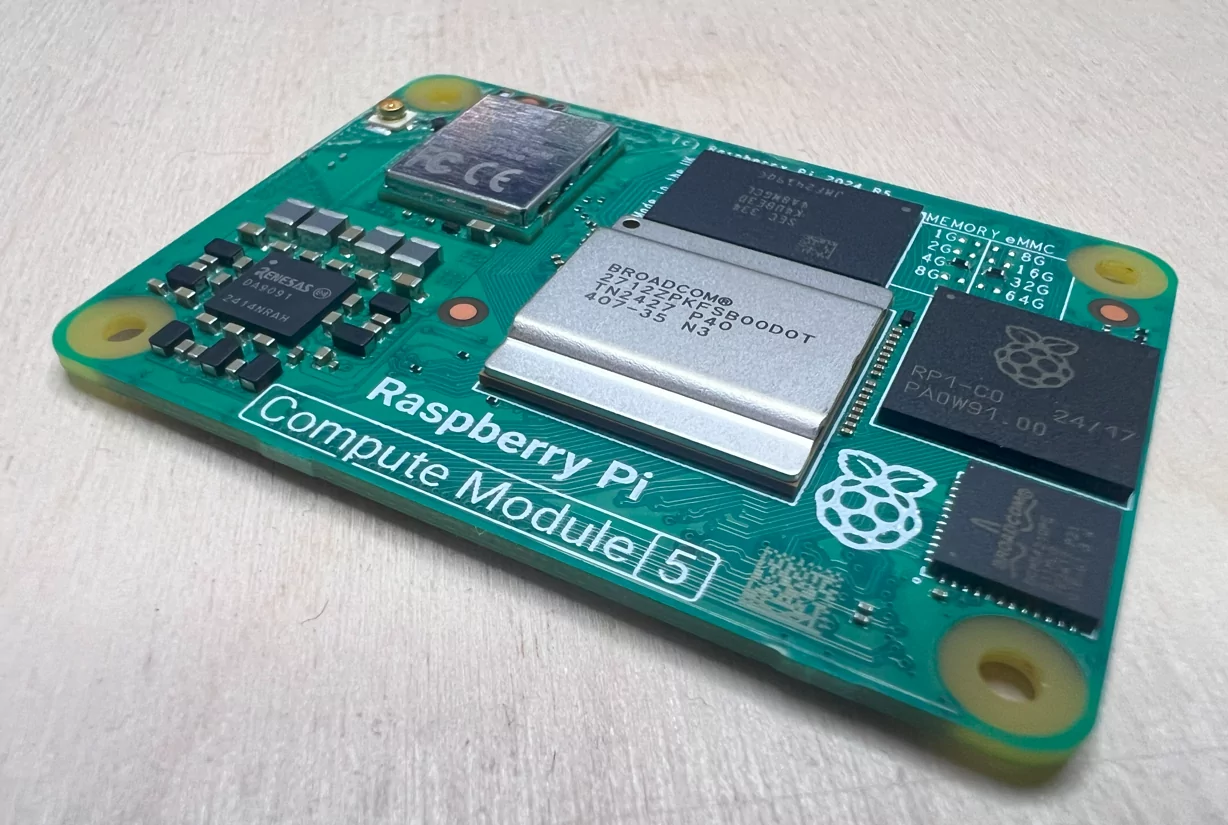
Those informative leaks showed us a few key changes regarding IO options available on the CM5’s IO Board and a heatsink and enclosure to accompany it. The inclusion of a heatsink to the lineup seems obvious given the same happened with the Raspberry Pi 5, as increased heat came with increased power.
On that subject though, perhaps the “Cooler” in the title is a bit disingenuous as compared to the CM4 it’s going to be running a little hotter. The “cooler” references the newer Raspberry Pi CM5 utilising the D0 stepping which cut out some deadweight from the SoC (System on Chip, the “CPU” more or less) to make it use less power and therefore run cooler.
As we get into this, I’d like to thank Raspberry Pi for sending over the CM5 Development Kit that I’m testing today. As usual, however, they’ve had no editorial input, these are all my own words (I don’t think anyone else would claim them anyway), and there was no obligation for me to create this but come on, there was no way I was missing this one.
CM5 vs CM4: What’s Changed?
The changes between the CM5 and CM4 shouldn’t be a major surprise to those following the Pi product ranges given how the compute modules are specced but let’s quickly take a look.

Raspberry Pi Compute Module 5
Technical Specifications
| Compute Module 5 | Compute Module 4 | |
|---|---|---|
|
Form Factor
|
55 mm × 40 × 4.7 mm | 55 mm × 40 × 4.7 mm |
|
Processor
|
Broadcom BCM2712 Quad-Core Cortex-A76 @ 2.4GHz | Broadcom BCM2711 Quad-Core Cortex-A72 @ 1.5GHz |
|
Memory
|
2GB, 4GB, 8GB or 16GB LPDDR4X | 1GB, 2GB, 4GB or 8GB LPDDR4 |
| eMMC Storage | 0GB, 16GB, 32GB, or 64GB | 0GB, 8GB, 16GB, or 32GB |
|
Connectivity
|
|
|
|
Video
|
|
|
|
Multimedia
|
H.265 (4Kp60 decode), OpenGL ES 3.1 graphics, Vulkan 1.2 | H.265 (4Kp60 decode), H.264 (1080p60 decode, 1080p30 encode), OpenGL ES 3.0 graphics |
|
Power
|
5V (up to 5A with USB-PD) via USB-C | 5V DC, 12V DC via Barrel Jack on IO Board |
|
Operating Temperature
|
-20°C to +85°C | -20°C to +85°C |
| Extras | RTC Battery Connection, Power Button, 4-pin PWM fan header | RTC Battery Connection, 4-pin PWN fan header |
|
Production Lifetime
|
Raspberry Pi Compute Module 5 will remain in production until at least | Raspberry Pi Compute Module 4 will remain in production until at least January 2034 |
| Compute Module 5 | Compute Module 4 |
|---|---|
|
Form Factor
|
|
| 55 mm × 40 × 4.7 mm | 55 mm × 40 × 4.7 mm |
|
Processor
|
|
| Broadcom BCM2712 Quad-Core Cortex-A76 @ 2.4GHz | Broadcom BCM2711 Quad-Core Cortex-A72 @ 1.5GHz |
|
Memory
|
|
| 2GB, 4GB, 8GB or 16GB LPDDR4X | 1GB, 2GB, 4GB or 8GB LPDDR4 |
|
eMMC Storage
|
|
| 0GB, 16GB, 32GB, or 64GB | 0GB, 8GB, 16GB, or 32GB |
|
Connectivity
|
|
|
|
|
Video
|
|
|
|
|
Multimedia
|
|
| H.265 (4Kp60 decode), OpenGL ES 3.1 graphics, Vulkan 1.2 | H.265 (4Kp60 decode), H.264 (1080p60 decode, 1080p30 encode), OpenGL ES 3.0 graphics |
|
Power
|
|
| 5V (up to 5A with USB-PD) via USB-C | 5V DC (12V DC Barrel Jack avail. on IO Board) |
|
Extras
|
|
| RTC Battery Connection, Power Button, 4-pin PWM fan header | RTC Battery Connection, 4-pin PWM fan header |
|
Operating Temperature
|
|
| -20°C to +85°C | -20°C to +85°C |
|
Production Lifetime
|
|
| Raspberry Pi Compute Module 5 will remain in production until at least TBC | Raspberry Pi Compute Module 4 will remain in production until at least January 2034 |
The most obvious difference is in the SoC itself, as we jump from the Broadcom BCM2711 to the newer BCM2712 which is a jump from 4×1.5GHz to 4×2.4GHz cores. This brings with it a fairly hefty performance increase compared to the CM4 but in return, we do draw a fair chunk more power and throw out more heat to boot, hence Raspberry Pi making sure there was a heatsink available too.
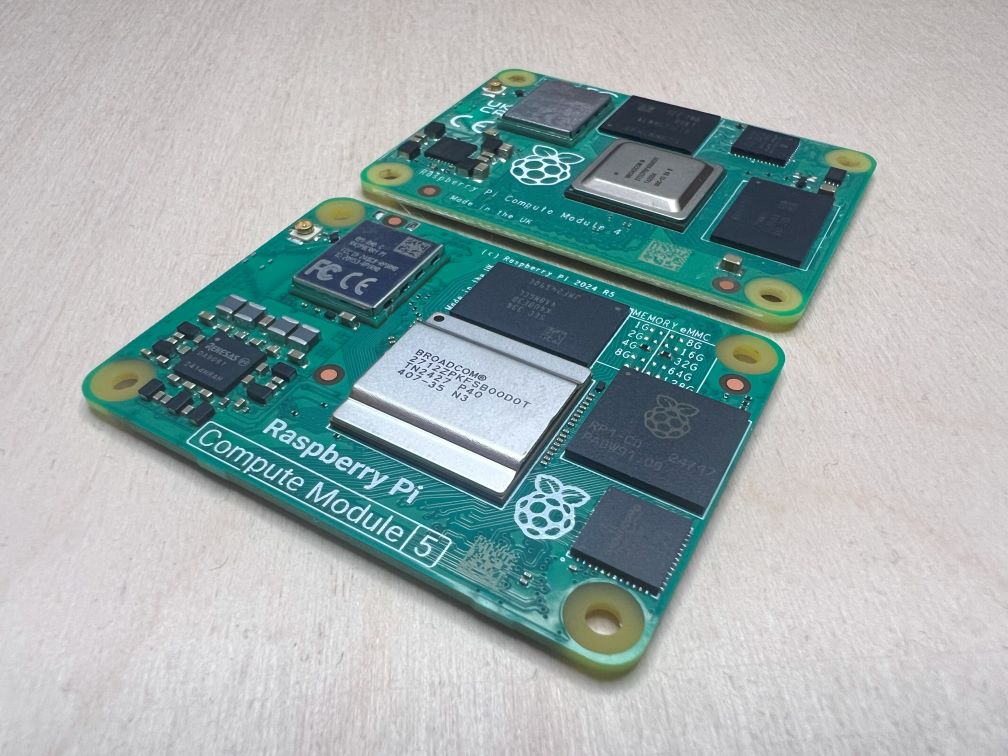
Storage is where we see another slight difference as instead of having a PCIe slot on the IO Board, we have an M.2 2232/2240/2282 connector to throw an NVMe SSD (or anything else you AliExpress deep dive lovers find to stick in it) in for storage. You’re still getting eMMC on the non-Lite models, though if you end up with eMMC, remember that you won’t be able to use microSD on the IO/carrier boards.
Much like the Pi 4 to Pi 5 jump, we’re missing some video decoders (which may be a big thing for some industrial users), and we go from dedicated CSI/DSI ports to the 2 combo CSI/DSI ports. Along with those, we lose 2x ADC inputs and composite video.
Is the CM5 Pin Compatible with the CM4?
For the most part, yes, though are there certain pins that are mapped differently so you may find that things don’t quite work as expected. I’ve lifted the technical details of these changes and formatted them below for those interested.

Compute Module 4 to 5 Pin Changes
Technical Specifications
| Pin | CM4 | CM5 | Comment |
|---|---|---|---|
| 16 | SYNC_IN | Fan_tacho | Fan tacho input |
| 19 | Ethernet rLED1 | Fan_pwm | Fan PWM output |
| 76 | Reserved | VBAT | RTC battery. Note there will be a constant load of a few uA even if the CM5 is powered. |
| 92 | RUN_PG | PWR_Button | Replicates the power button on Raspberry Pi 5. A short press signals that the device should wake up or shut down. A long press forces shutdown. |
| 93 | nRPIBOOT | nRPIBOOT | For a short time after power-up, if the PWR_button is low this pin will also be set low |
| 94 | AnalogIP1 | CC1 | This pin can connect to the CC1 line of a Type C USB connector to enable the PMIC to negotiate 5A |
| 96 | AnalogIP0 | CC2 | This pin can connect to the CC2 line of a Type C USB connector to enable the PMIC to negotiate 5A |
| 99 | Global_EN | PMIC_ENABLE | No external change |
| 100 | nEXTRST | CAM_GPIO1 | Pulled up on Raspberry Pi Compute Module 5, but can be forced low to emulate a RESET signal |
| 104 | Reserved | PCIE_RET_nWAKE | PCIe nWAKE. Pull up to CM5.3v3 with an 8.2K resistor. |
| 106 | Reserved | PCIE_PWR_EN | Signals if the PCIe device can be powered up or down. Active high. |
| 111 | VDAC_COMP | VBUS_EN | Output to signal USB VBUS should be enabled |
| 128 | CAM0_D0_N | USB3-0-RX_N | May be P/N swapped |
| 130 | CAM0_D0_P | USB3-0-RX_P | May be P/N swapped |
| 134 | CAM0_D1_N | USB3-0-DP | USB 2 signal |
| 136 | CAM0_D1_P | USB3-0-DM | USB 2 signal |
| 140 | CAM0_C_N | USB3-0-TX_N | May be P/N swapped |
| 142 | CAM0_C_P | USB3-0-TX_P | May be P/N swapped |
| 157 | DSI0_D0_N | USB3-1-RX_N | May be P/N swapped |
| 159 | DSI0_D0_P | USB3-1-RX_P | May be P/N swapped |
| 163 | DSI0_D1_N | USB3-1-DP | USB 2 signal |
| 165 | DSI0_D1_P | USB3-1-DM | USB 2 signal |
| 169 | DSI0_C_N | USB3-1-TX_N | May be P/N swapped |
| 171 | DSI0_C_P | USB3-1-TX_P | May be P/N swapped |
Getting Started with the Raspberry Pi CM5
At launch we only have the Raspberry Pi CM5 IO Board available, though, given the documentation available, I have no doubt we’re going to be seeing an absolute swarm of carrier boards hitting the market soon. I know that Pineboards have a couple already in development that should be available very soon, though they’ll make their announcements for those in due course.
It’s a good place to start though and exposes everything available in terms of I/O. Setup is straightforward, with the CM5 firmly clicking into place via the pins on the IO board et voila, you’re ready to go. There are some jumpers for enabling certain features where only 1 can be available at a time so if that’s important to you, make sure you double-check that they’re in the correct position but otherwise, we’re off to the races.

OS installation is quick and easy, if you have a Lite model you can flash to a microSD card such as the official Raspberry Pi microSD cards, but otherwise, you can use a header to set it to boot in OTG USB mode to flash the OS to eMMC. By default, though, my unit came with NVMe as the preferred boot device.
It takes the same 5V5A power supply as the Pi 5 so you can repurpose one of those if you have one laying around, and whilst I’ll be booting from NVMe, you can boot over the network (on all models). microSD (on Lite models), or eMMC (on non-Lite models?) so you have plenty of options available.
Testing Methodology
Let’s start getting into the nitty gritty and the numbers, shall we? I don’t think we’ll be seeing anything too dissimilar to the Raspberry Pi 5, but it’s worth taking a look, especially at the features we can’t find on the Pi 5, such as eMMC!
For the testing, I’m going to be running the OS (latest available Raspberry Pi OS 64-bit Lite via Raspberry Pi Imager based on Linux kernel 6.6.6.51+rpt-rpi-2712) from the Raspberry Pi 256GB NVMe. I’ll still test the eMMC storage but for a boot device, it’s NVMe.
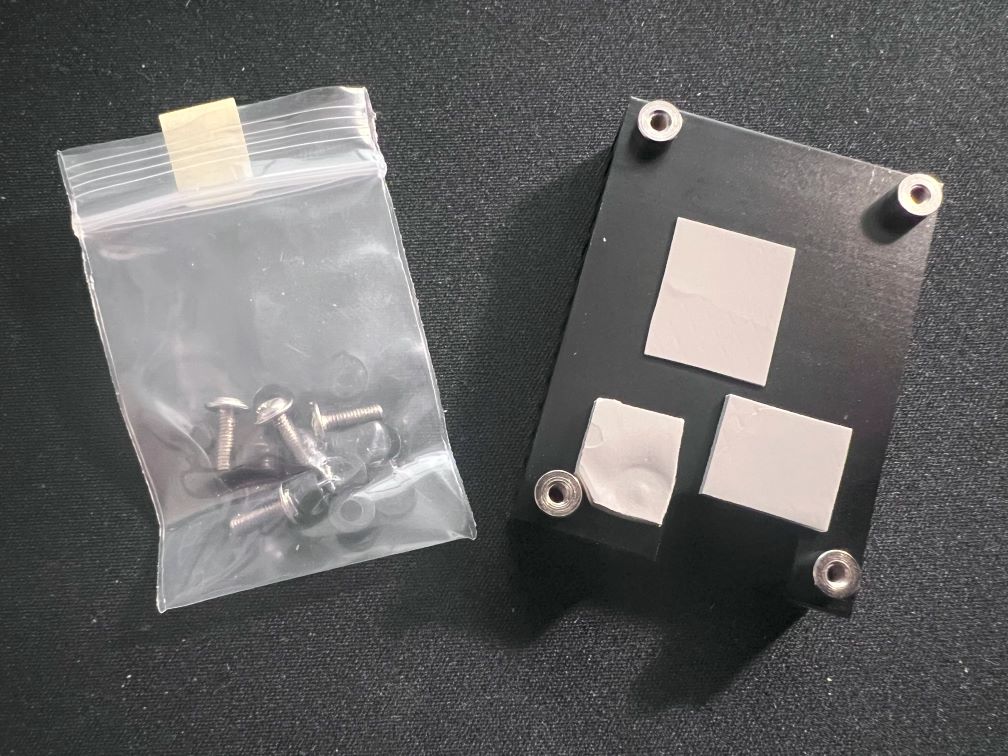
Cooling for all tests (bar the temperature testing, naturally) is provided by the official CM5 heatsink with a Noctua fan blowing over it to prevent any kind of thermal throttling, and yes, for these tests I will be using the performance CPU governor.
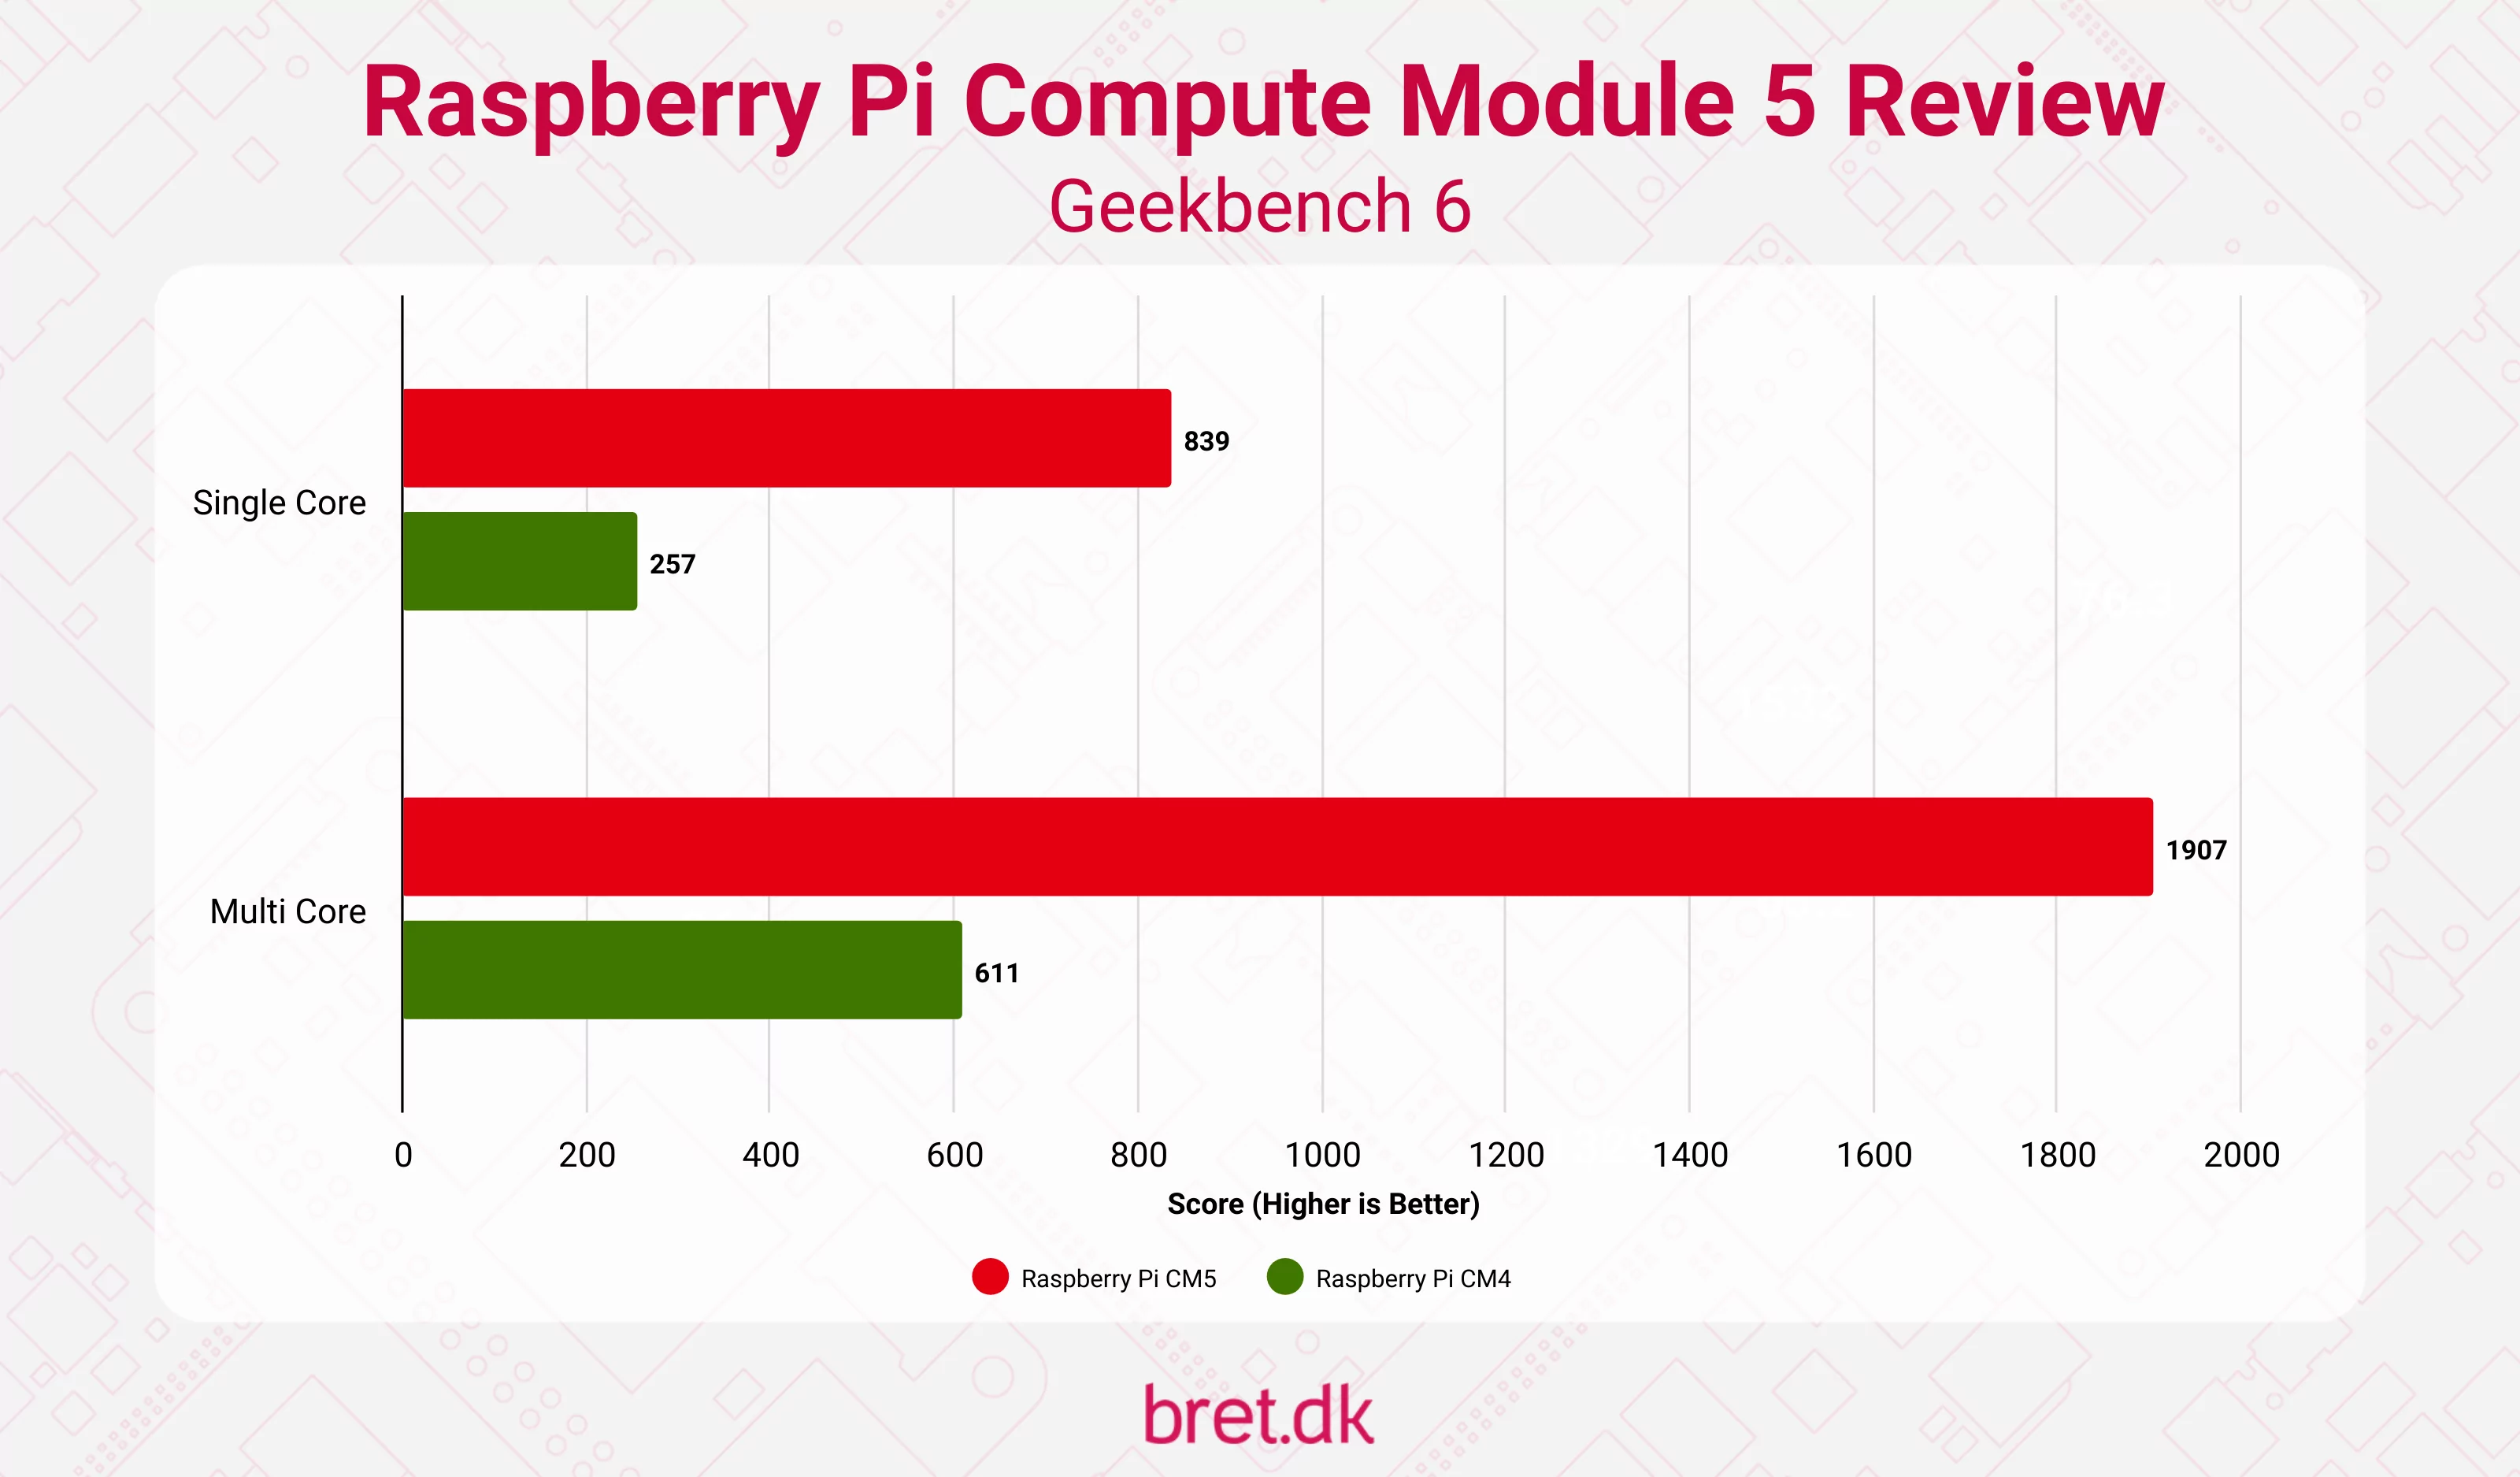
I’m not going to focus too much on CPU benchmarks as as I say, we’re not likely to be deviating from Pi 5 levels of performance on the whole, so I’ll be running through a few quick classics for simple comparisons (even if they’re not really great as benchmarks) and then doing a slightly deeper dive into specific features that are “unique” to the CM5.
Finally, all comparisons in these tests to the Compute Module 4 were fresh benchmarks, run on the same latest Raspberry Pi OS 64-bit Lite installed to the eMMC but, and it’s a big but, my Compute Module 4 is a 2GB RAM model with 16GB of eMMC storage.
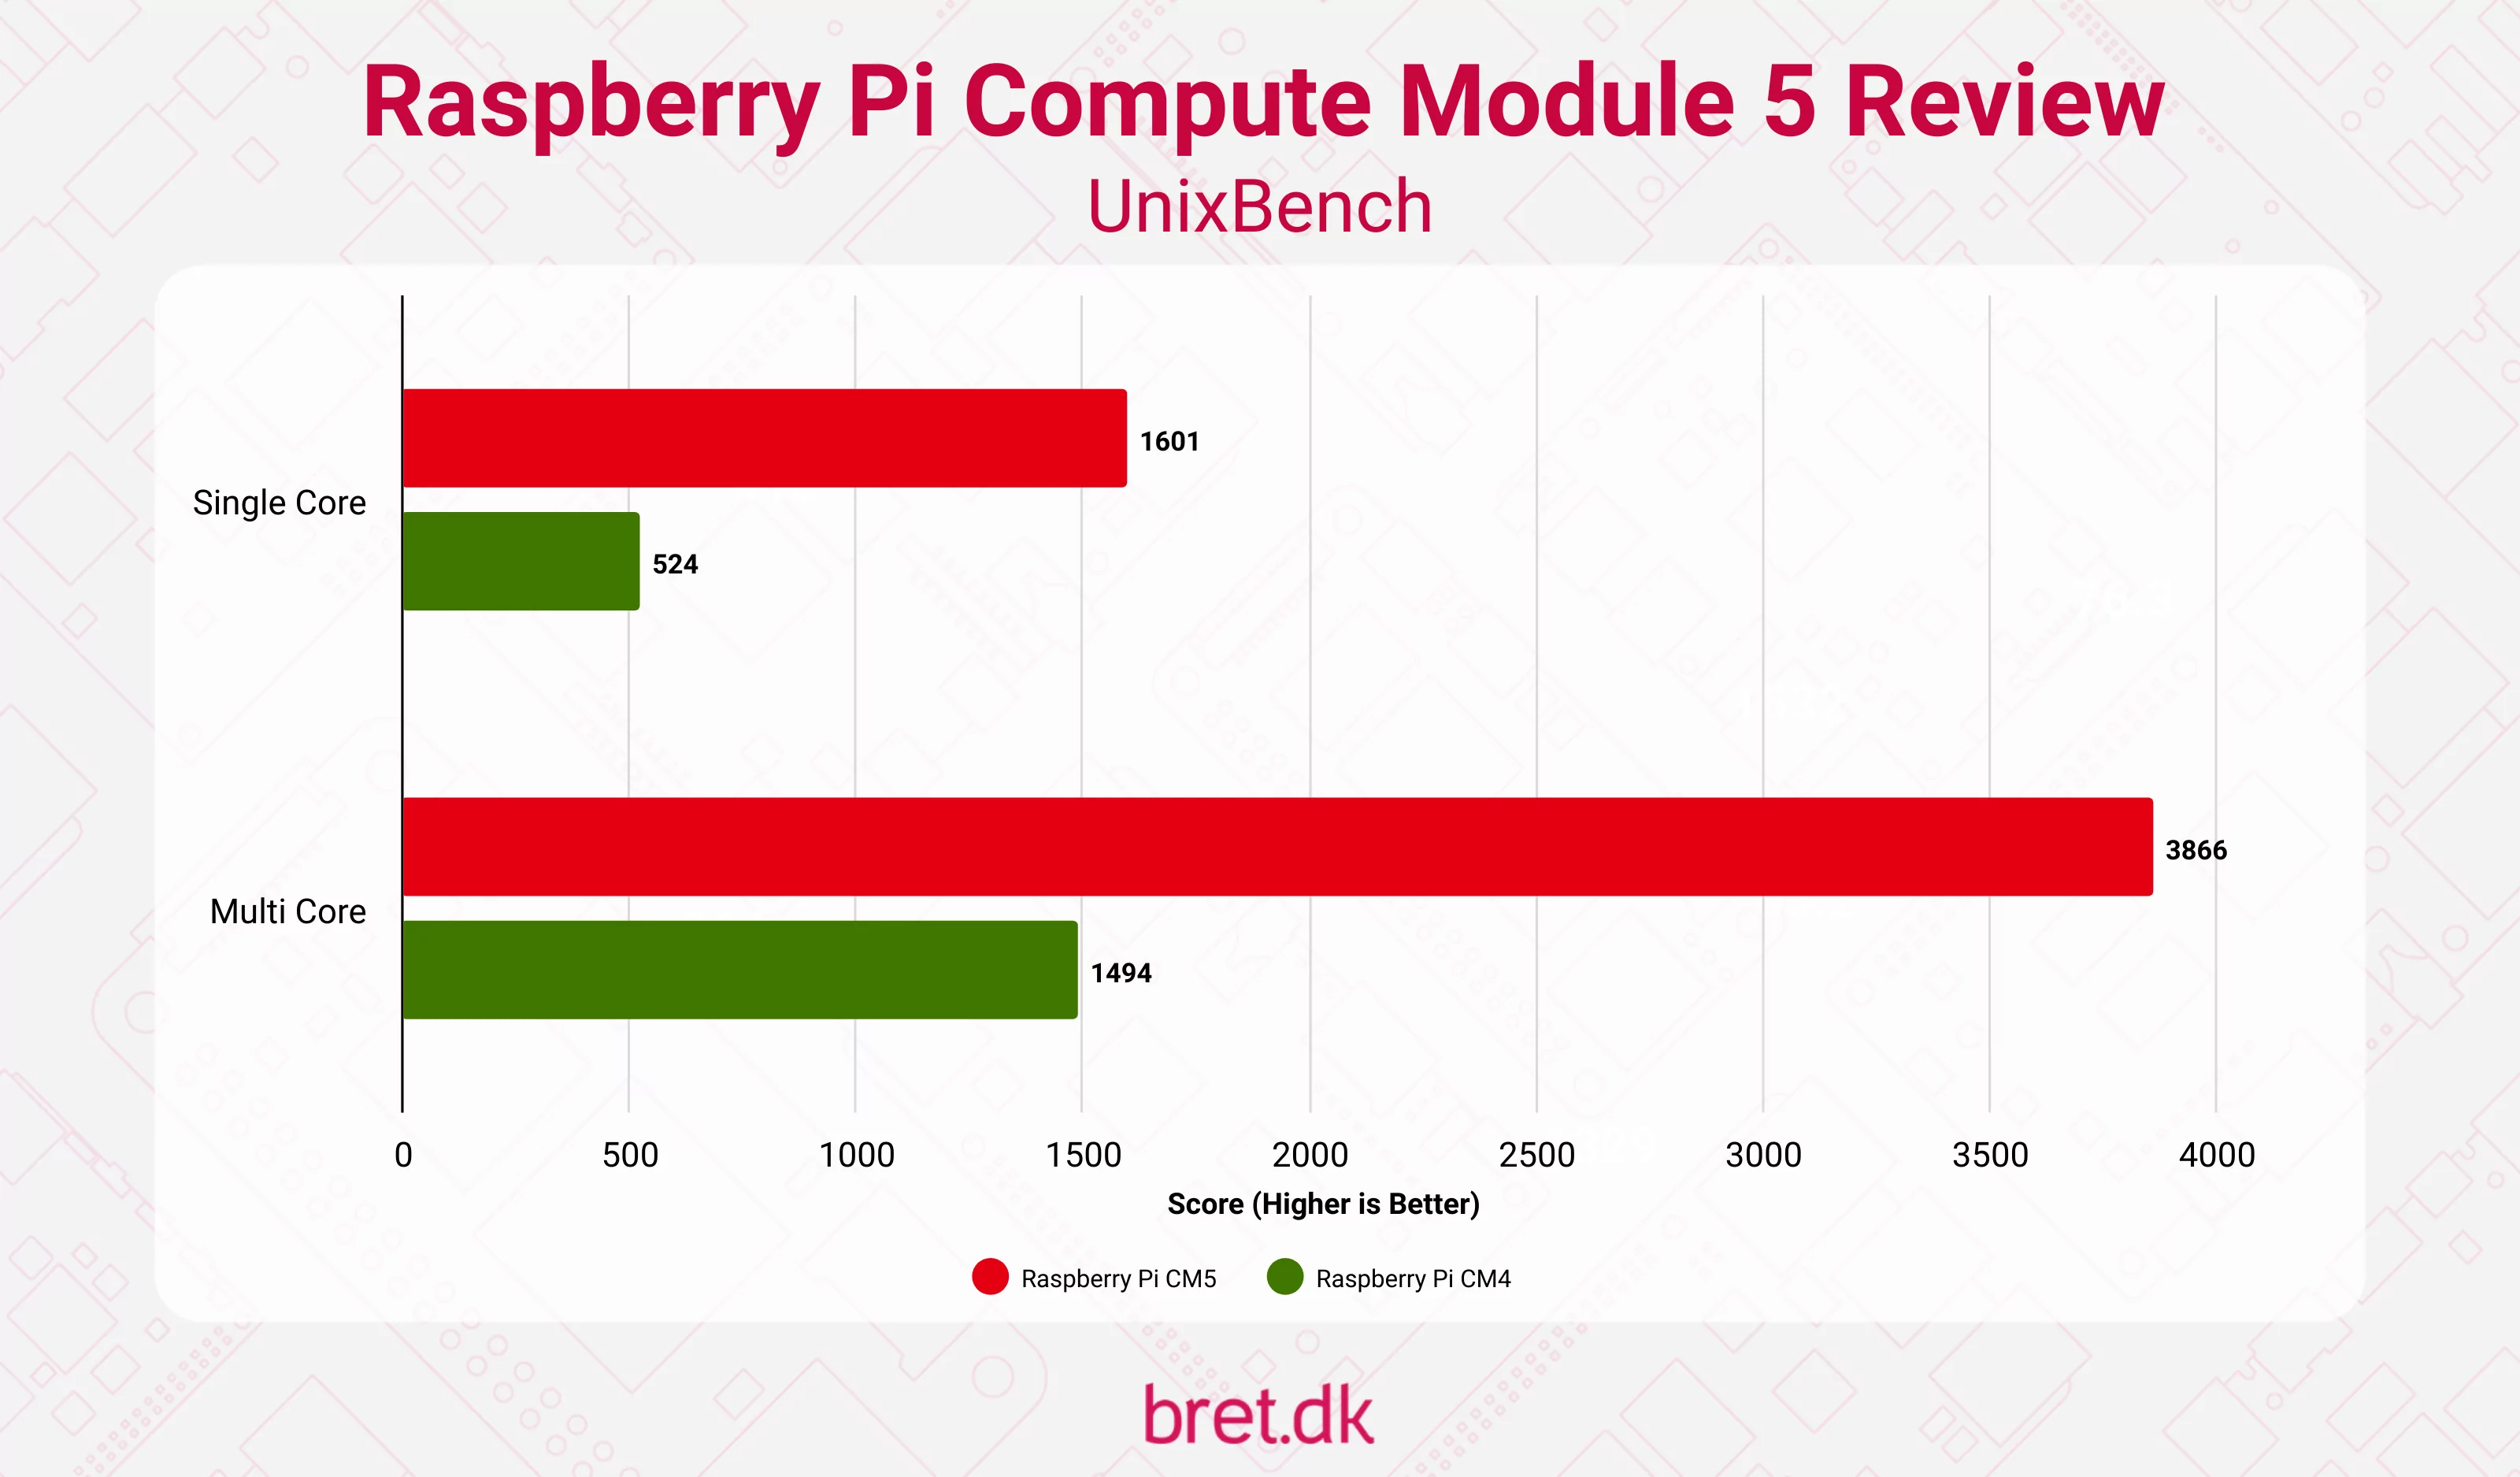
The lower spec RAM and smaller eMMC module will mean that this isn’t a completely apples-to-apples comparison, but this isn’t supposed to be a truly scientific test. It’s an overview of the differences with some quick benchmark numbers with what I have at hand. Anything like UnixBench that hits the storage at the same time is naturally going to be at a disadvantage on the CM4 due to it running from slower eMMC. Take things with a large pinch of salt.
Raspberry Pi Compute Module 5 Benchmarks
Geekbench 6
UnixBench
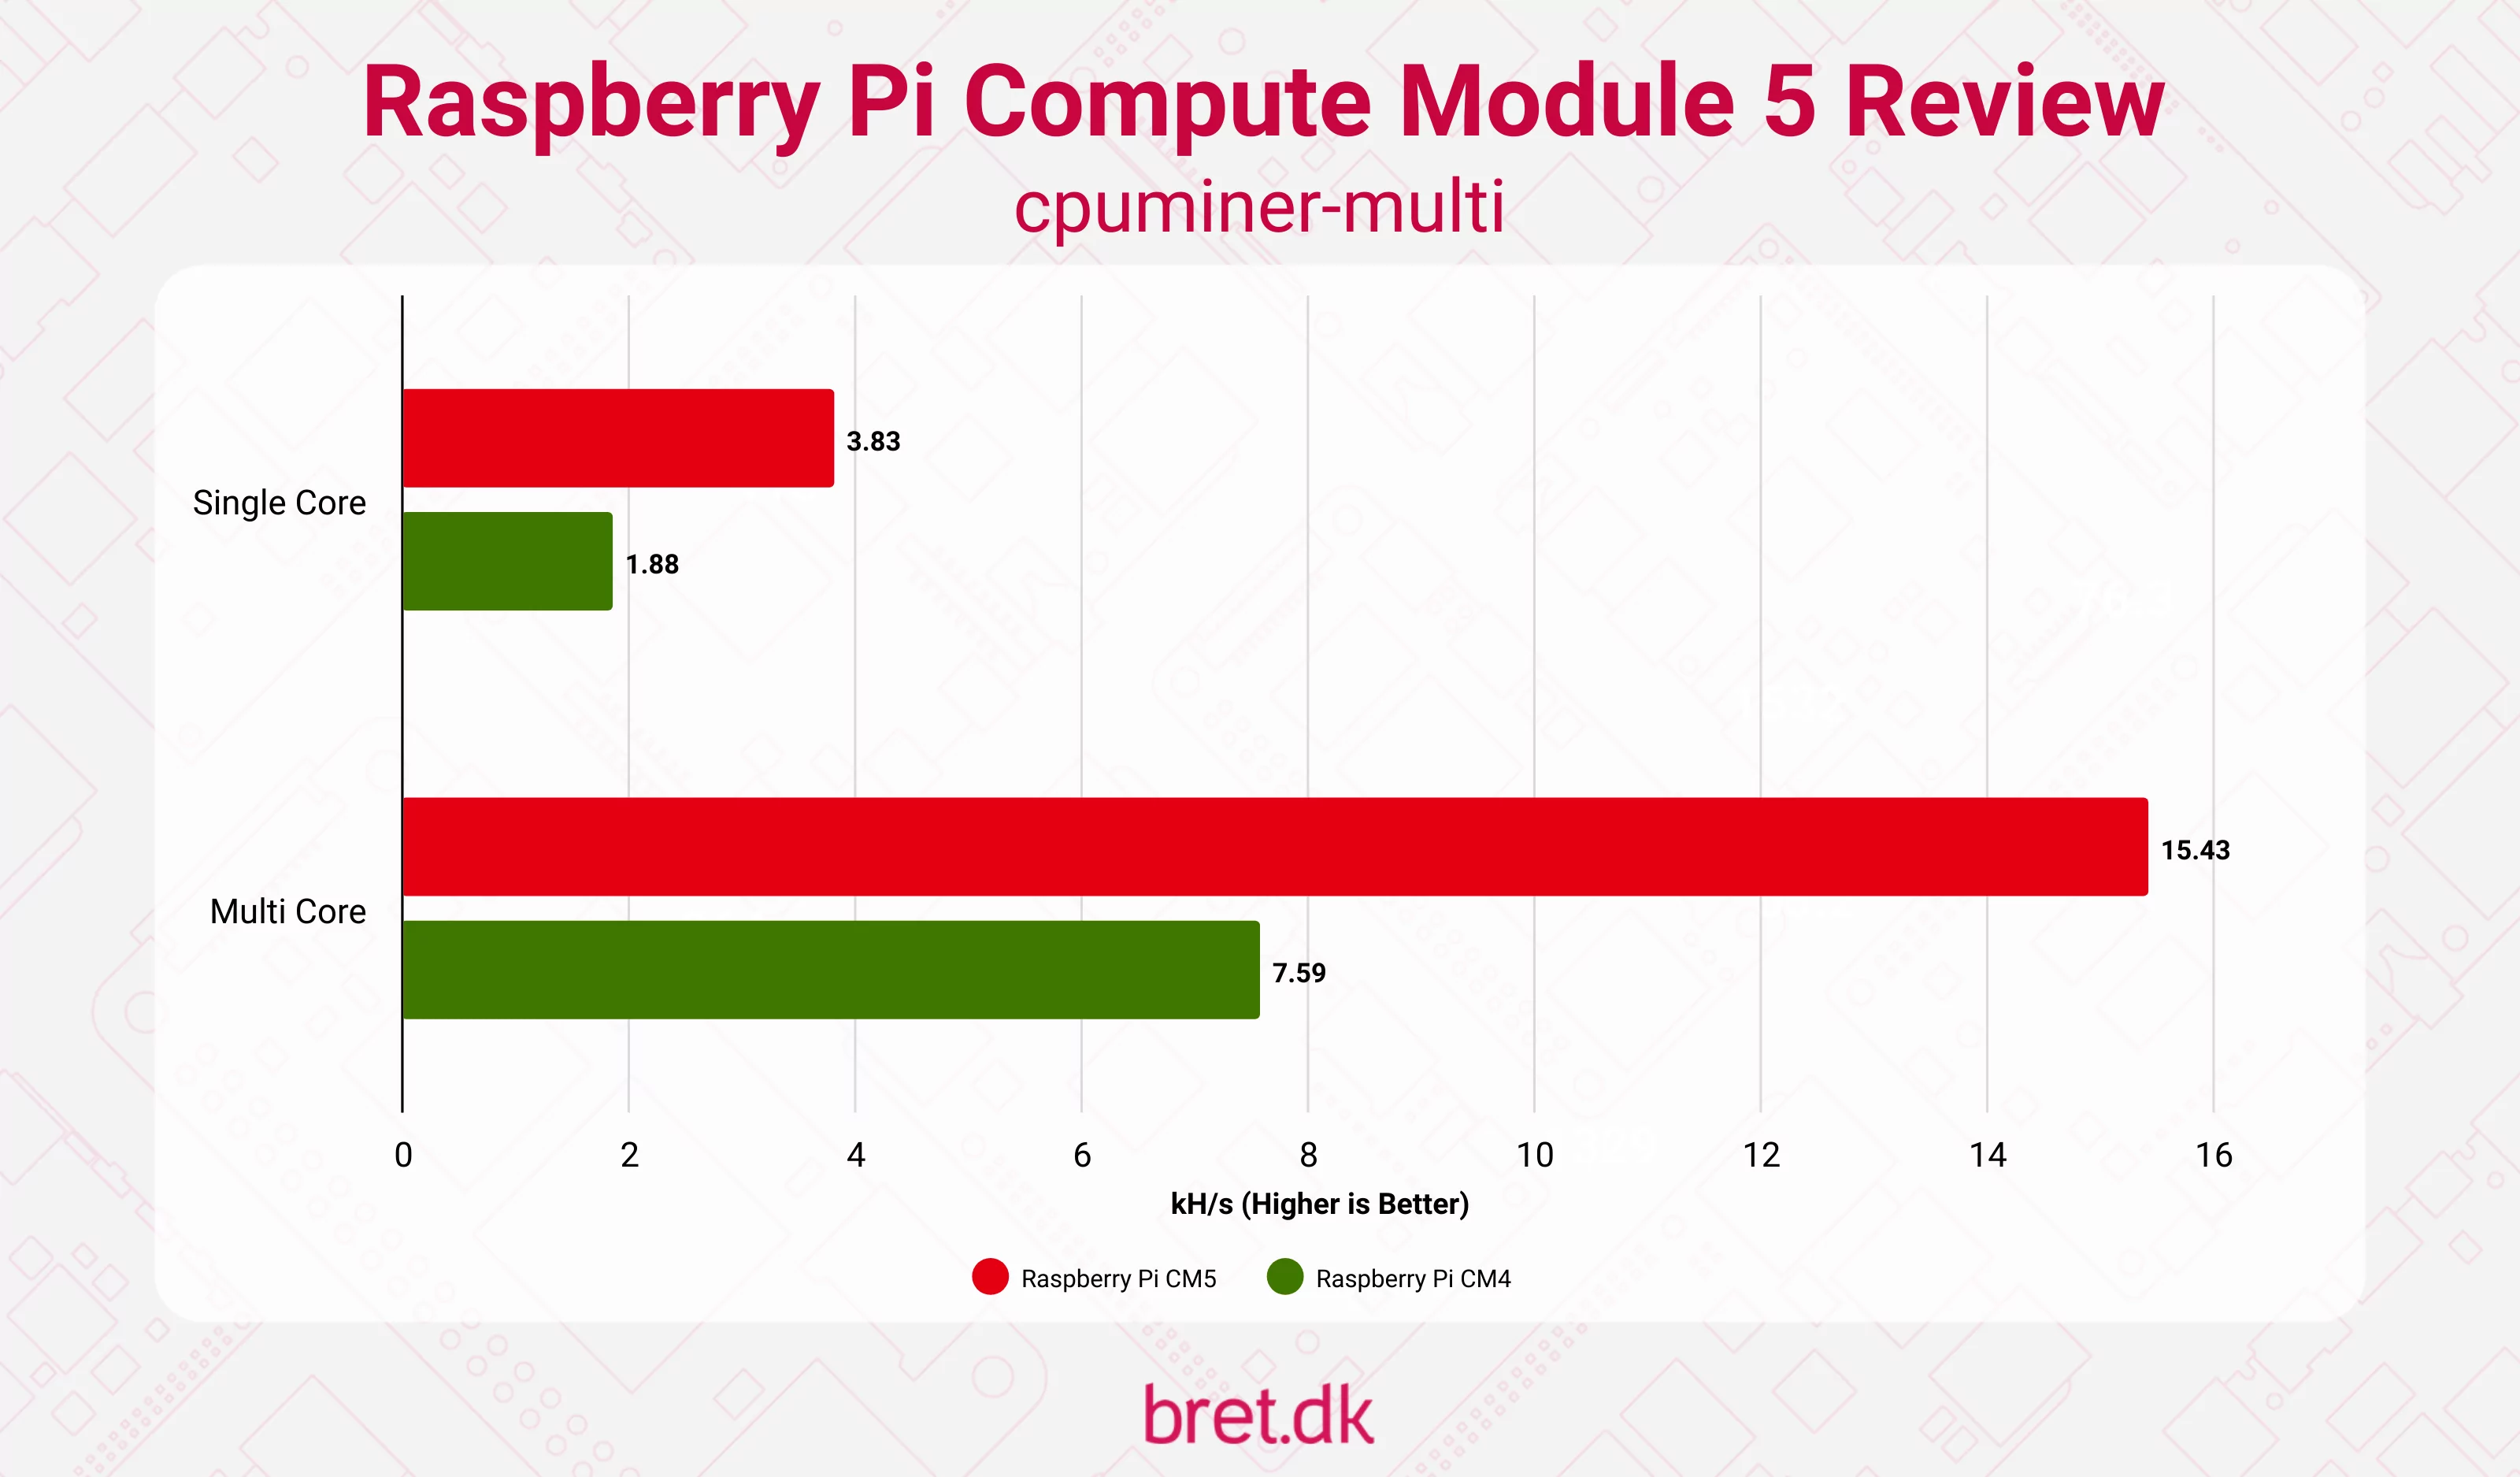
cpuminer-multi
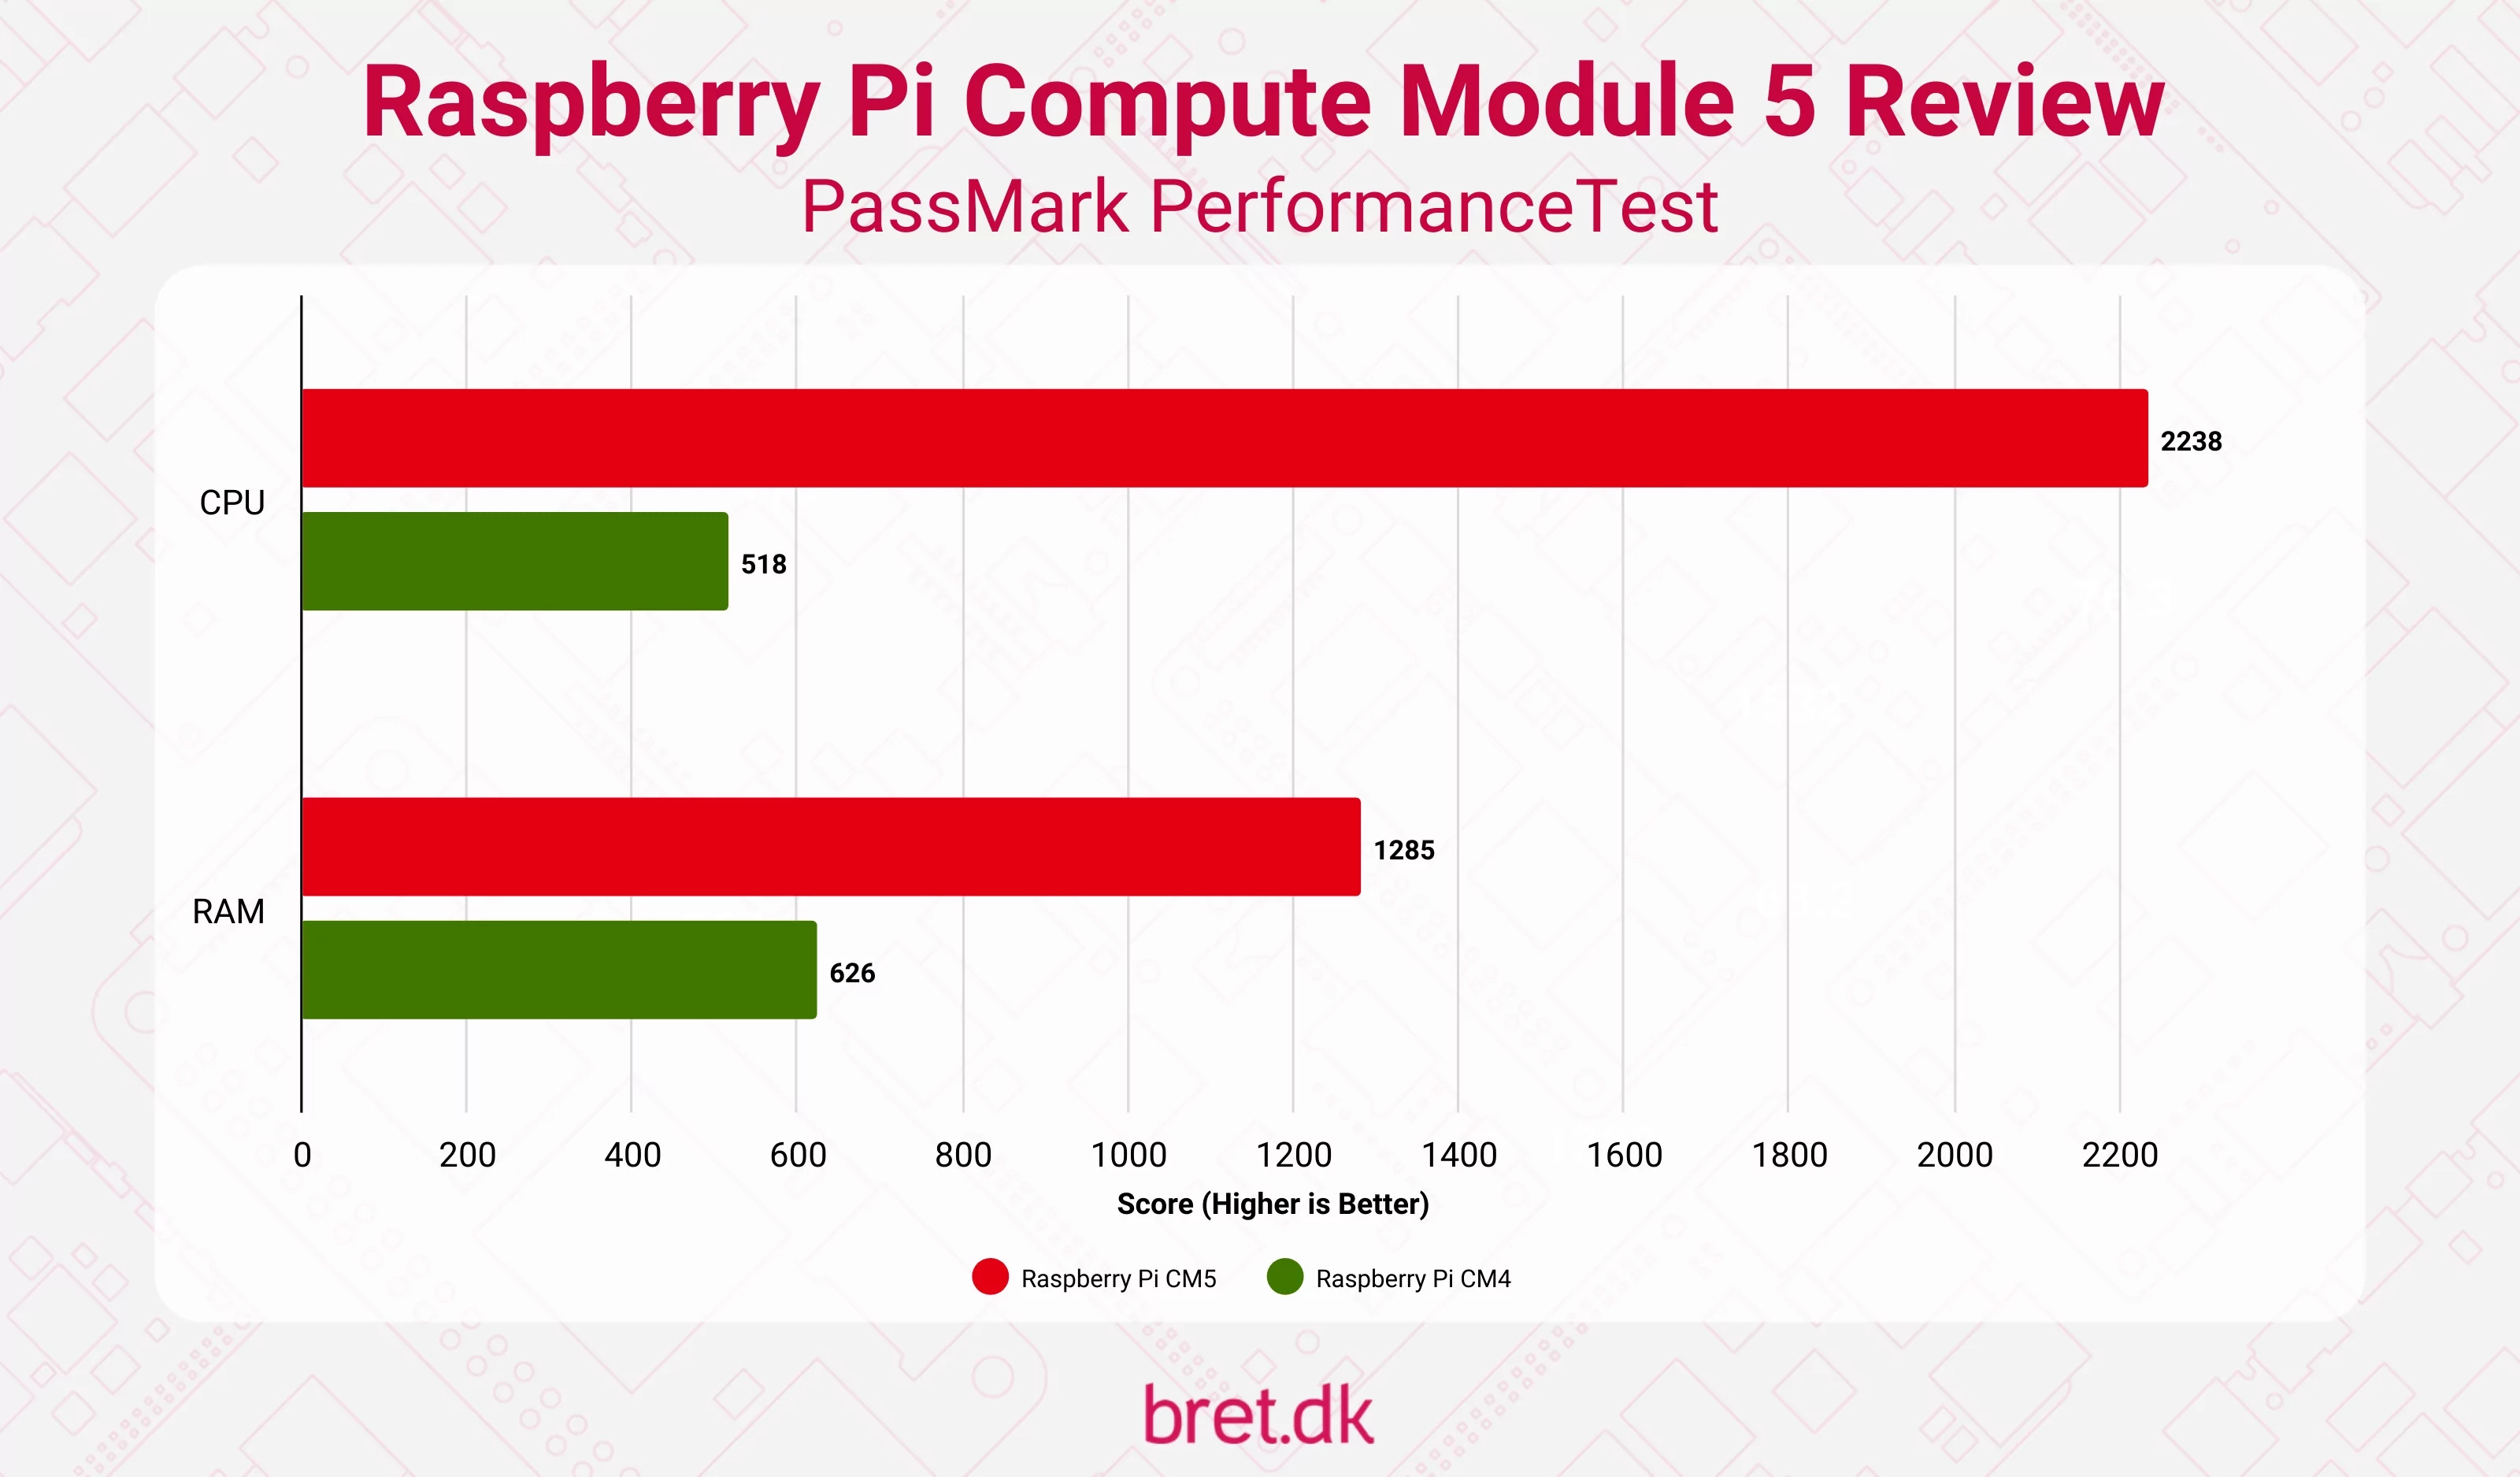
PassMark PerformanceTest
Storage Benchmarks
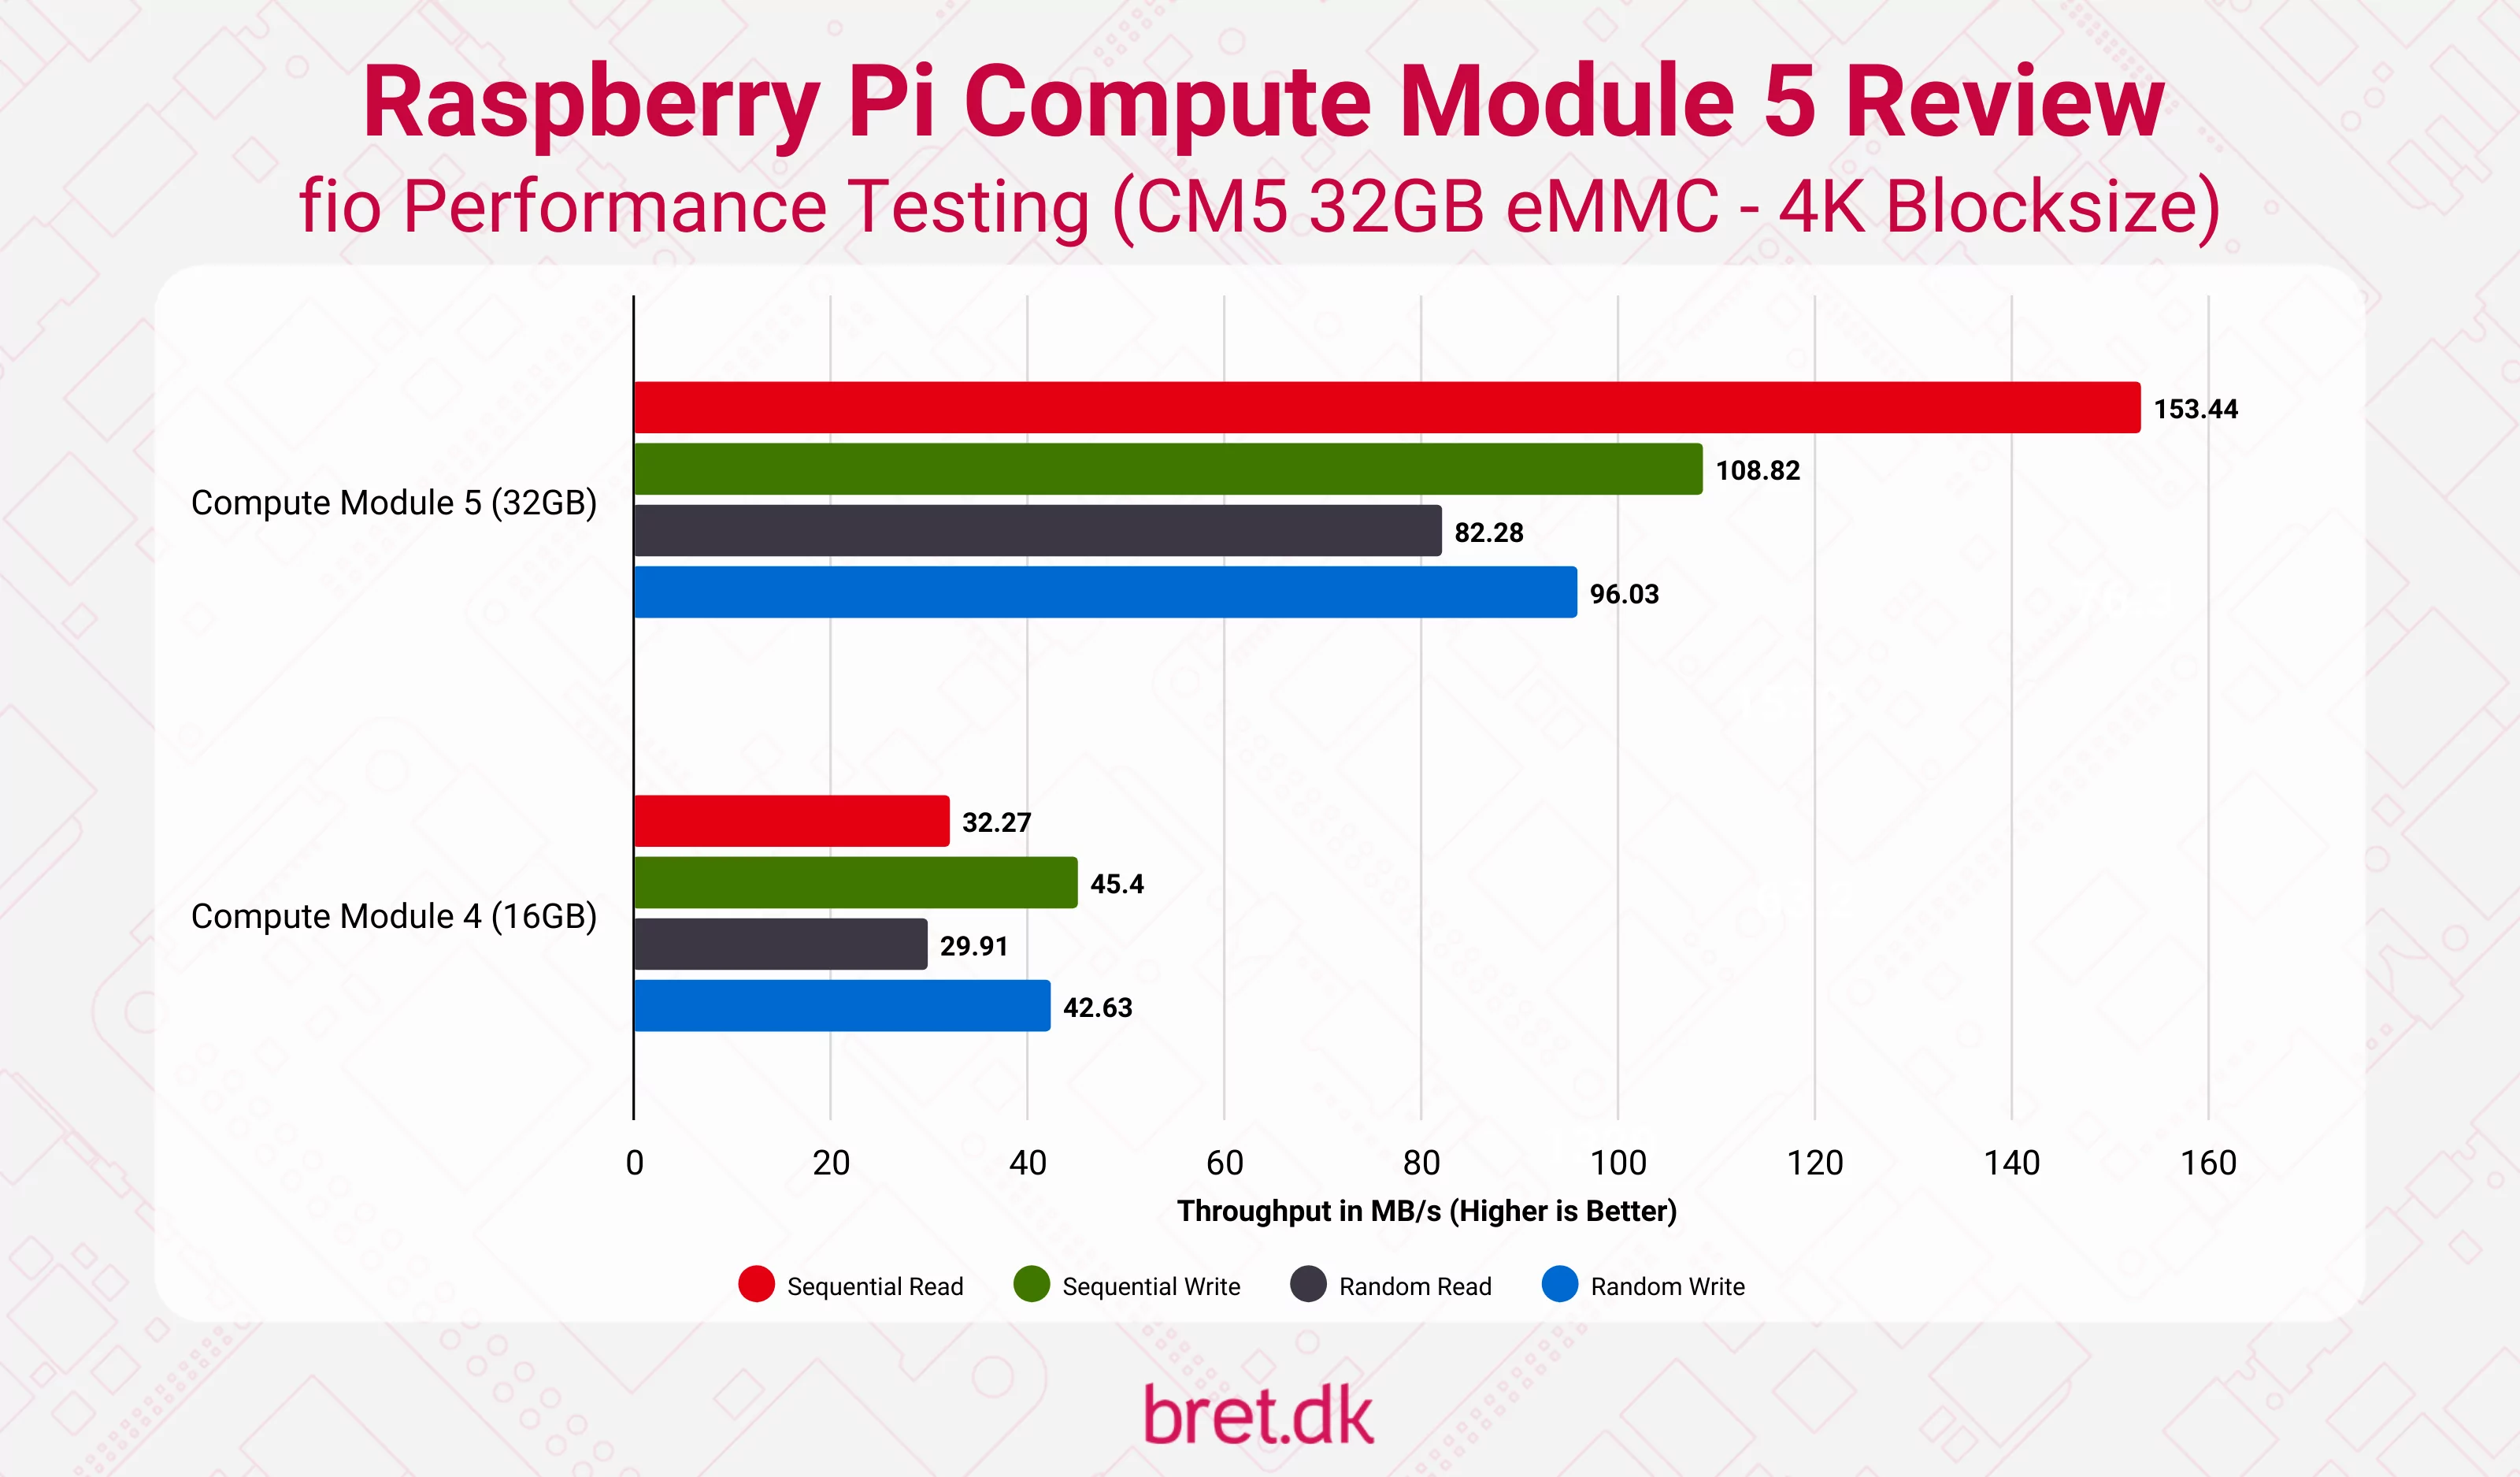
Onboard eMMC
A pleasant surprise is that the eMMC in the CM5 is very capable, and anyone looking for a small amount of fast onboard storage should consider whether it’s sufficient for their use case. It’s a big boost over that on the CM4, and I’m tempted to deploy an eMMC-backed CM5 in a future project now.. My usual gripe will be that it’s soldered on but in this form-factor, beggars can’t be choosers and you’ll need a steady soldering hand, or a dive into your wallet for a new CM5 if it goes kaput.
NVMe SSD via M.2 Connection
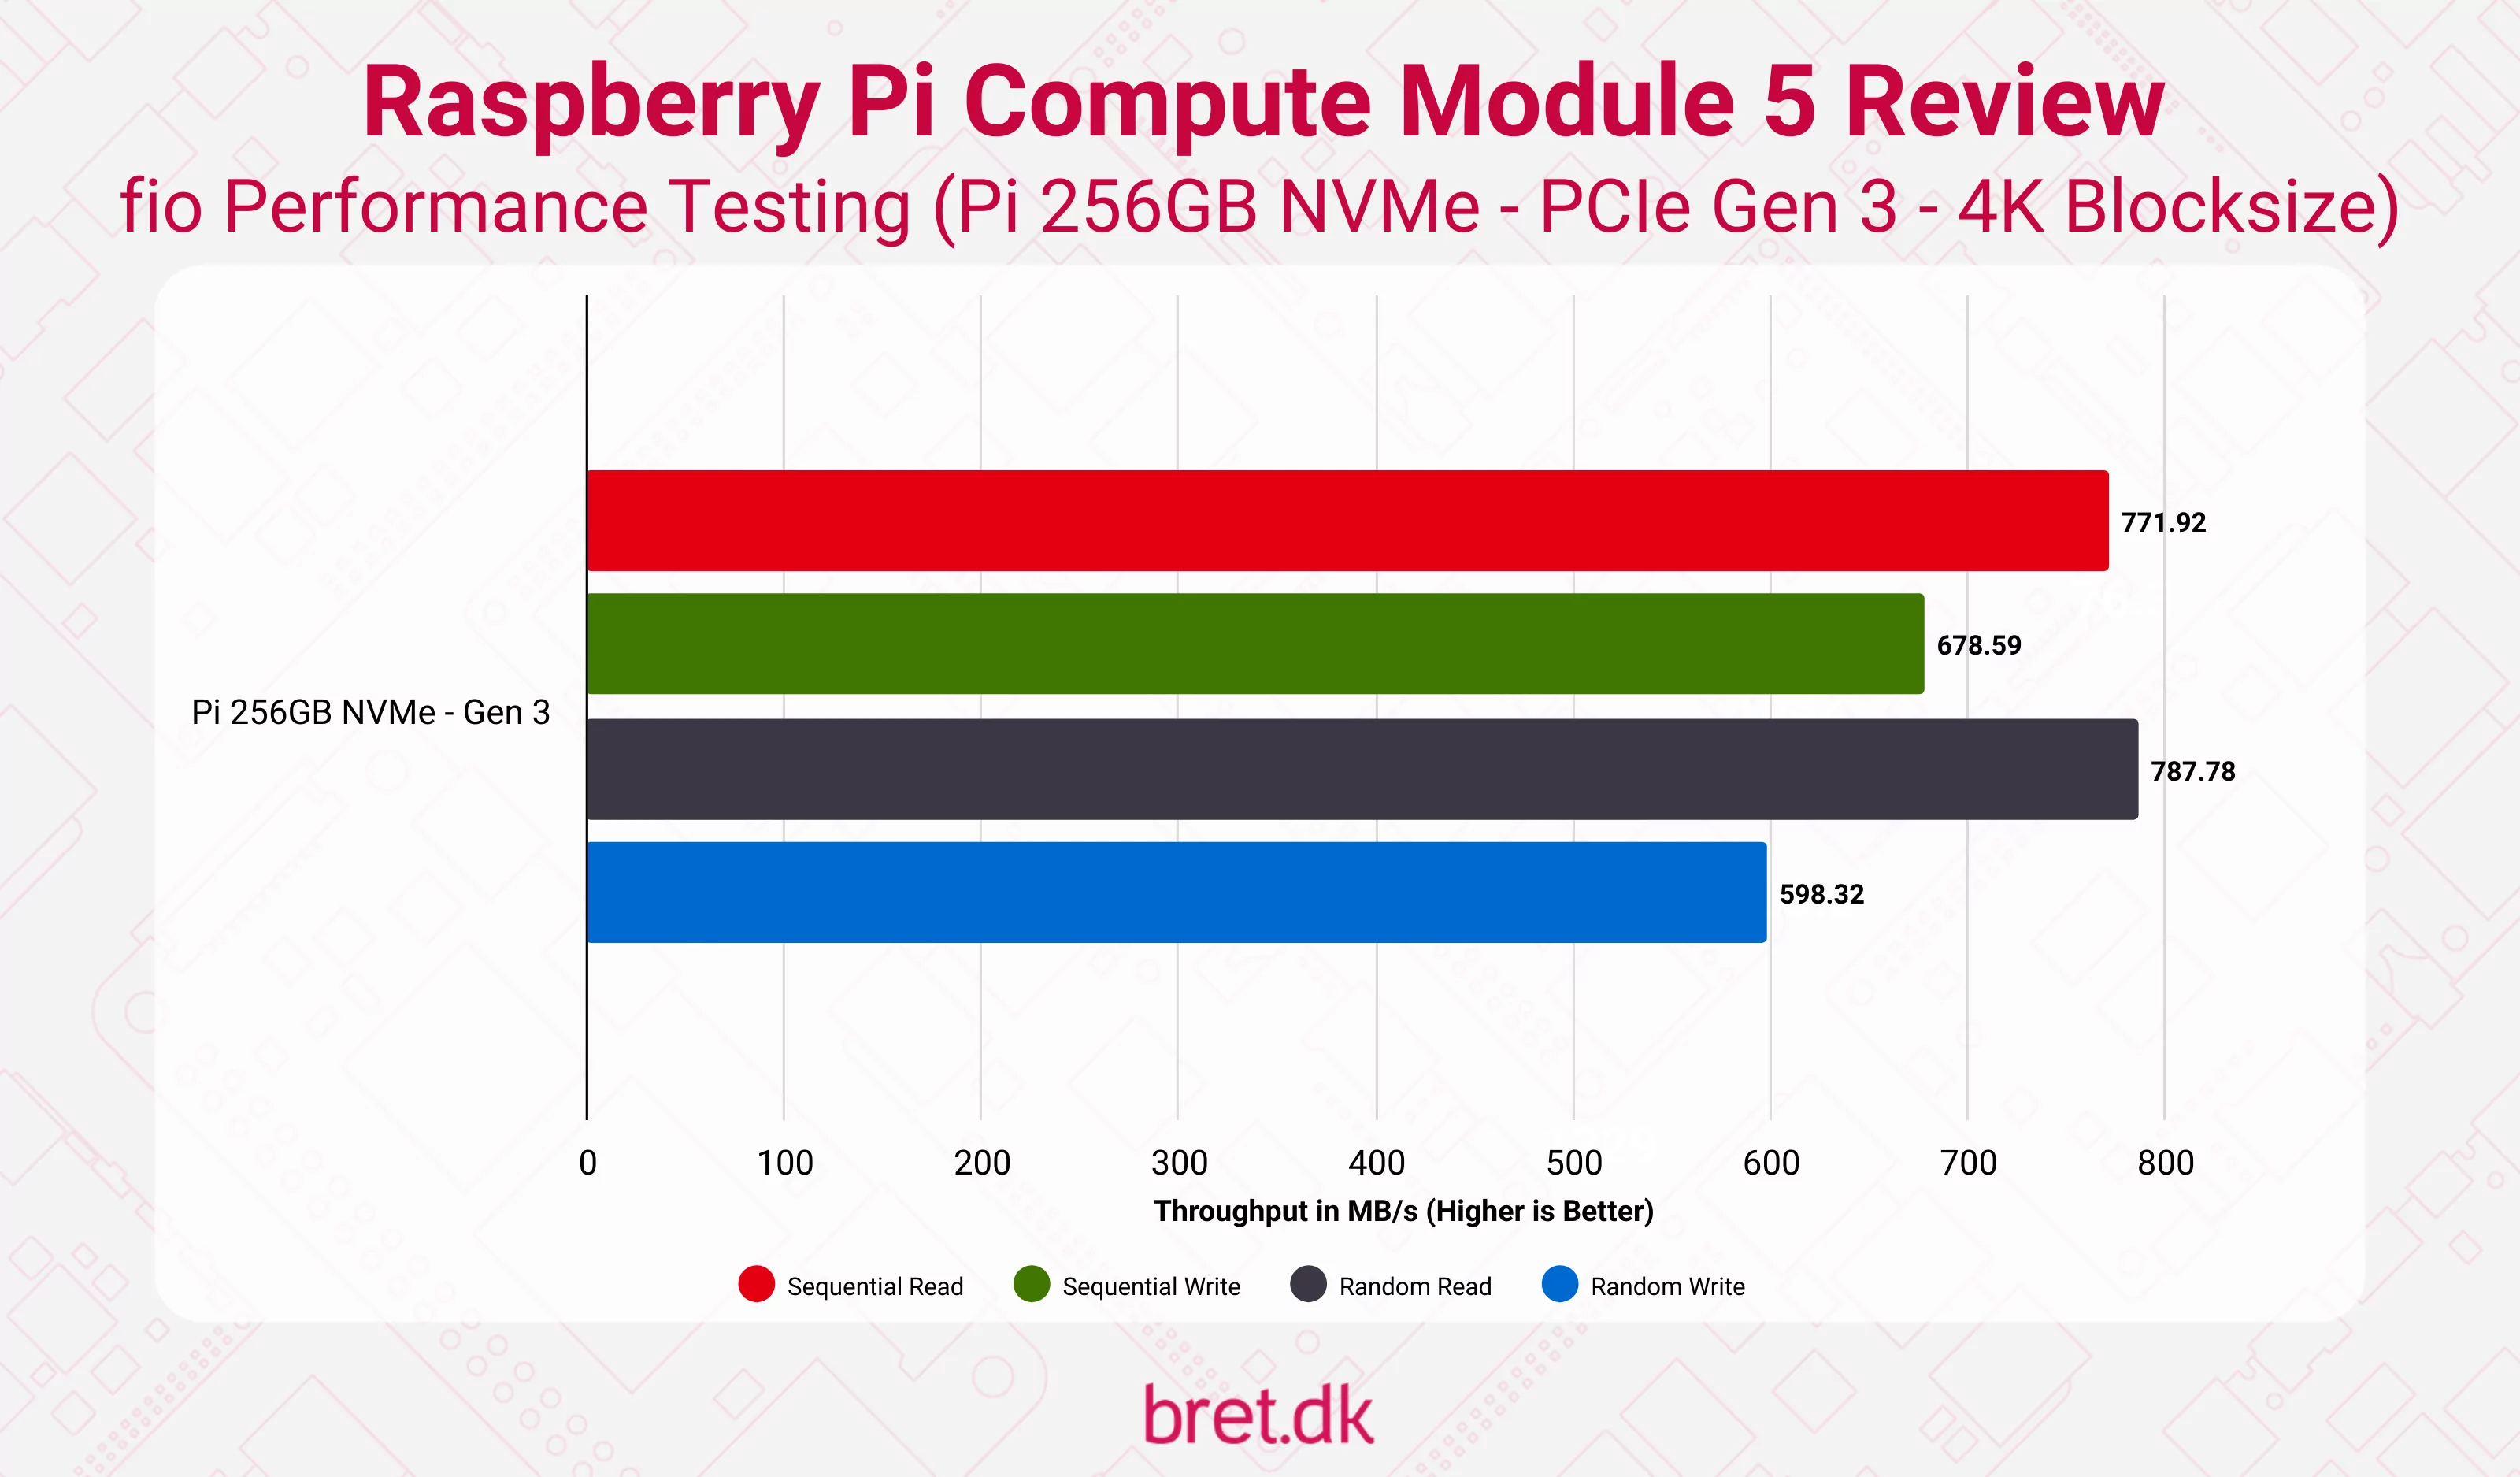
The PCIe x1 slot on the CM4 board has been replaced by a 2230/2242/2260/2280 M-Keyed M.2 connection, which the cynic in me thinks is purely because they now have the official NVMe drives but either way, I’ll take it. I won’t bore you with graphs here, I’ll give you the PCIe Gen 3 4K block size results as everything both on Gen 2 and Gen 3 is exactly as you’d expect and was the same as the NVMe review I posted above which is unsurprising.
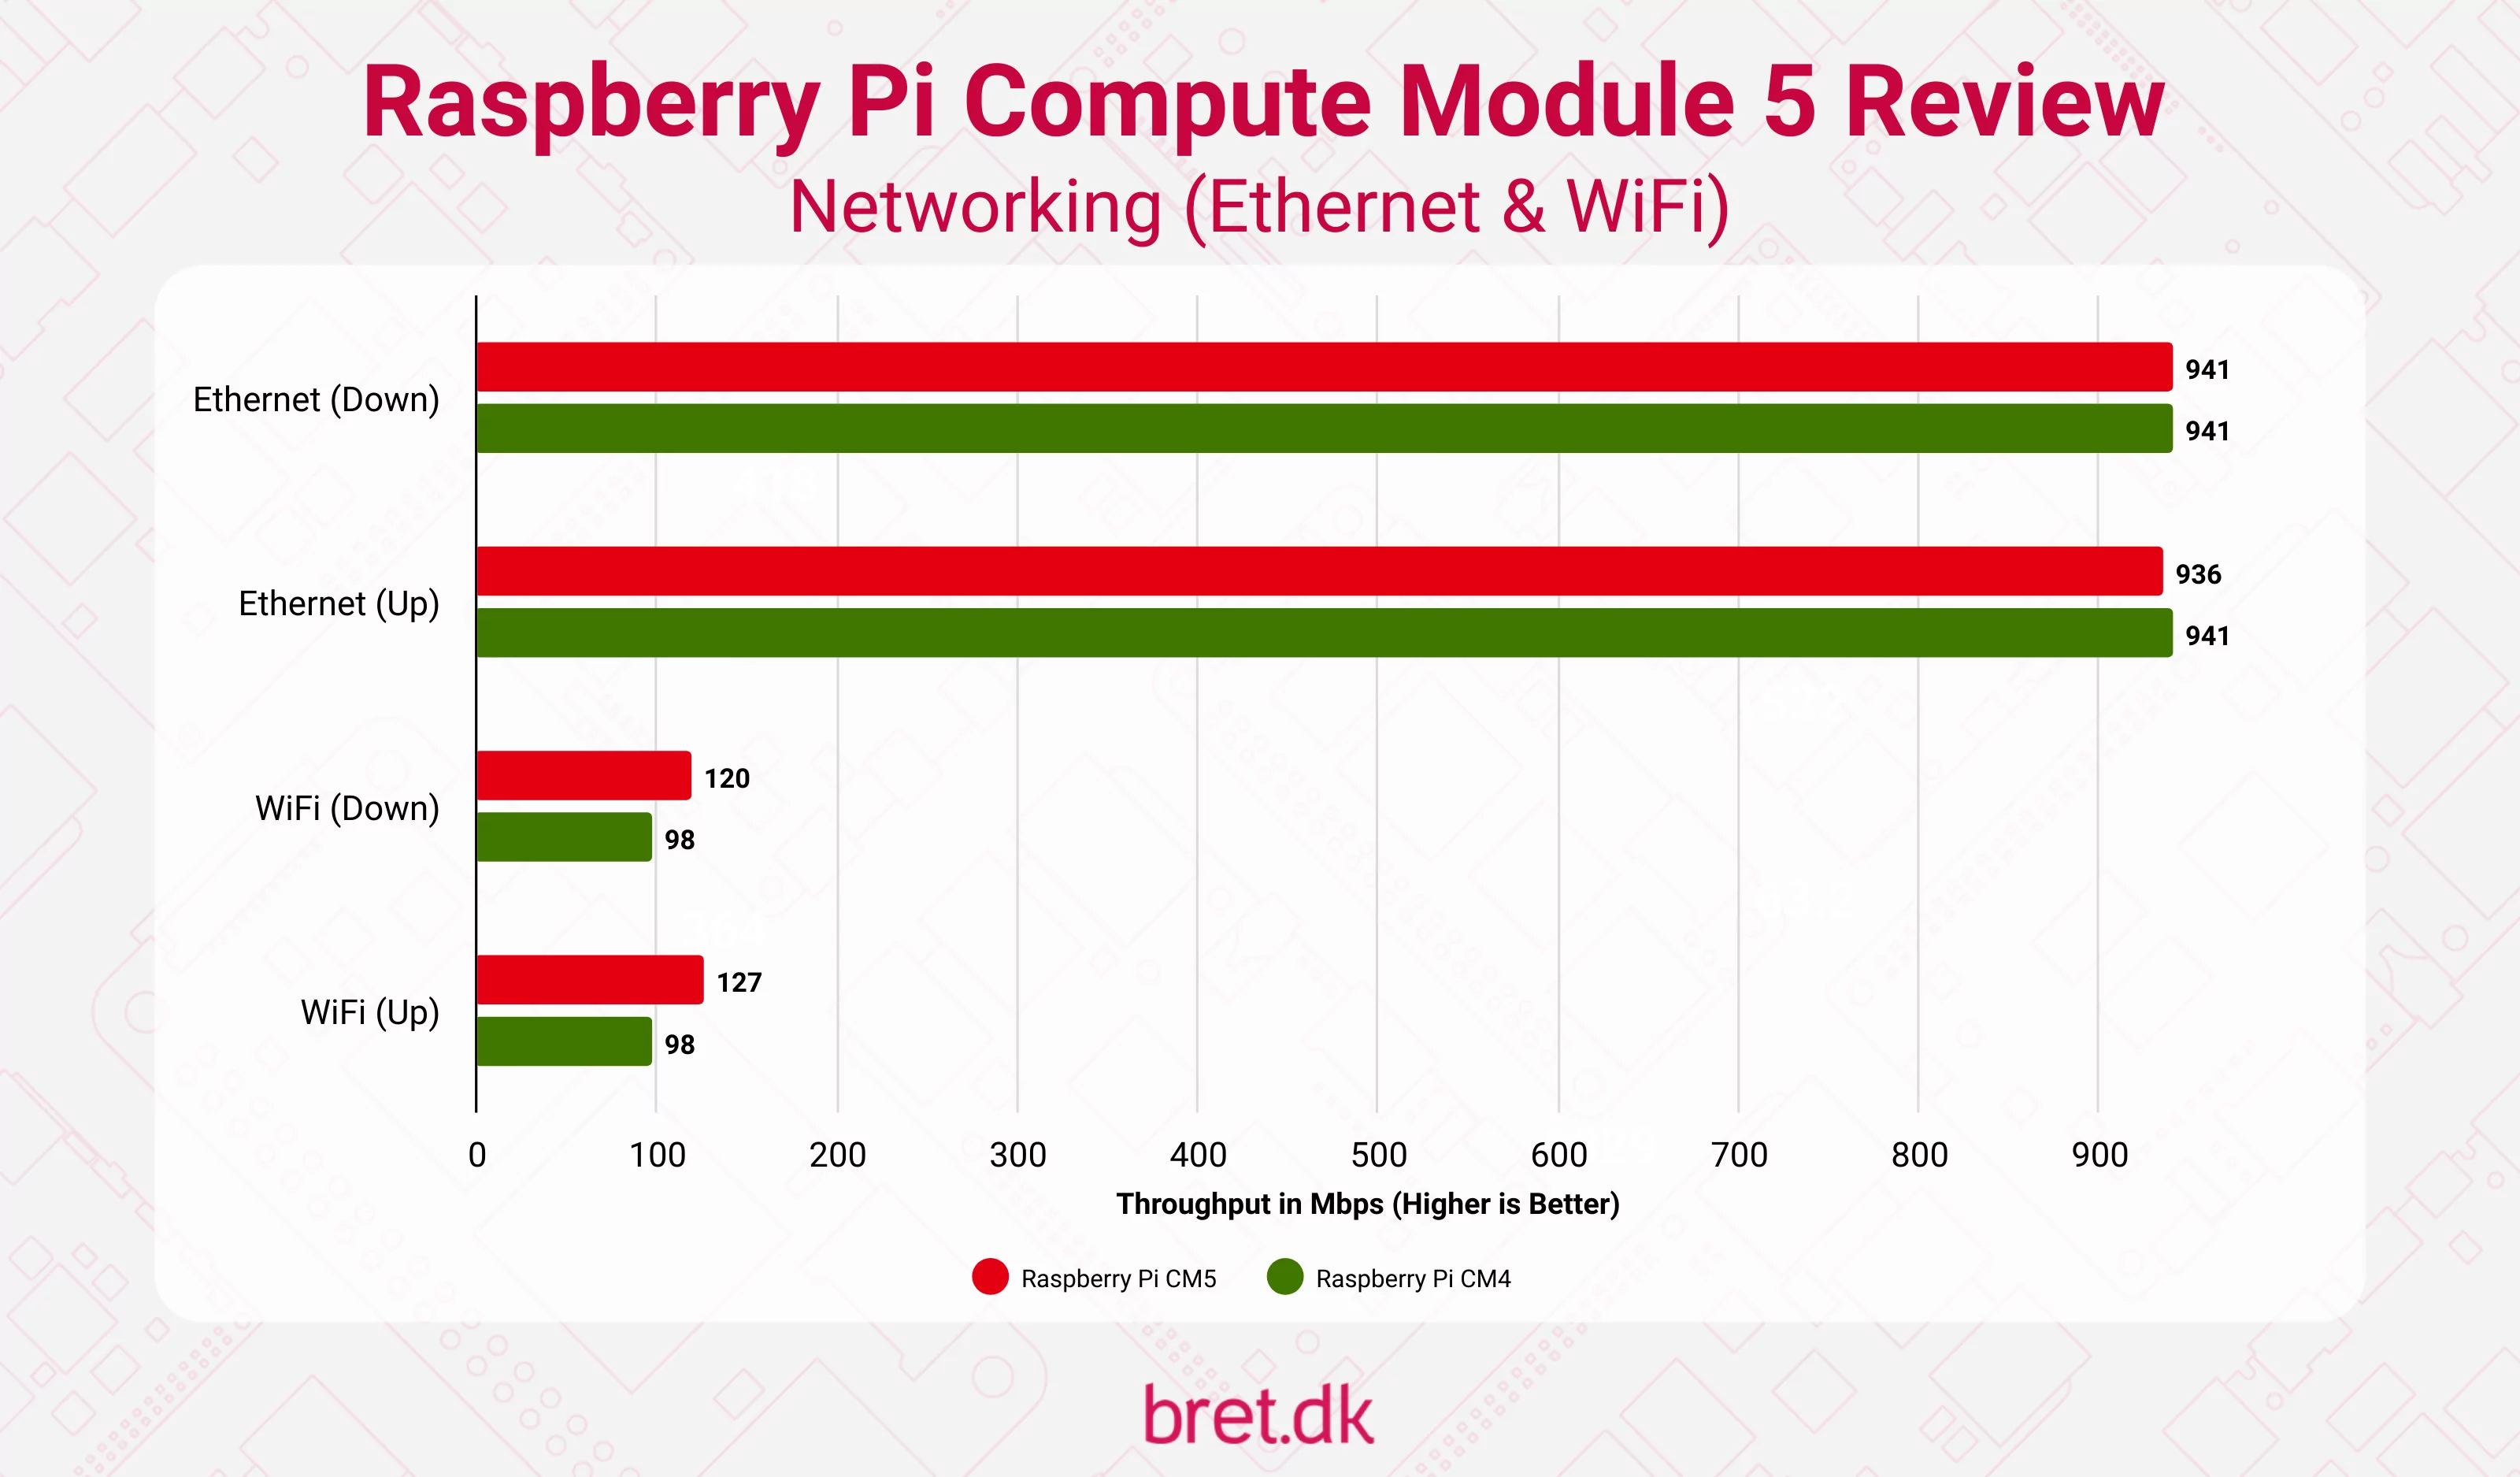
Network Testing
Temperatures / Thermals
I decided to go through and test every available combination I could think of, both in and out of the case, to try and cover most of the use cases needed by users, and there isn’t anything too surprising. All of the testing here was done in a room with an ambient temperature of 25 degrees Celsius. The “Case with Fan” test utilised the Raspberry Pi OS’ default fan settings so was off when idle, only ramping up as the test went on.
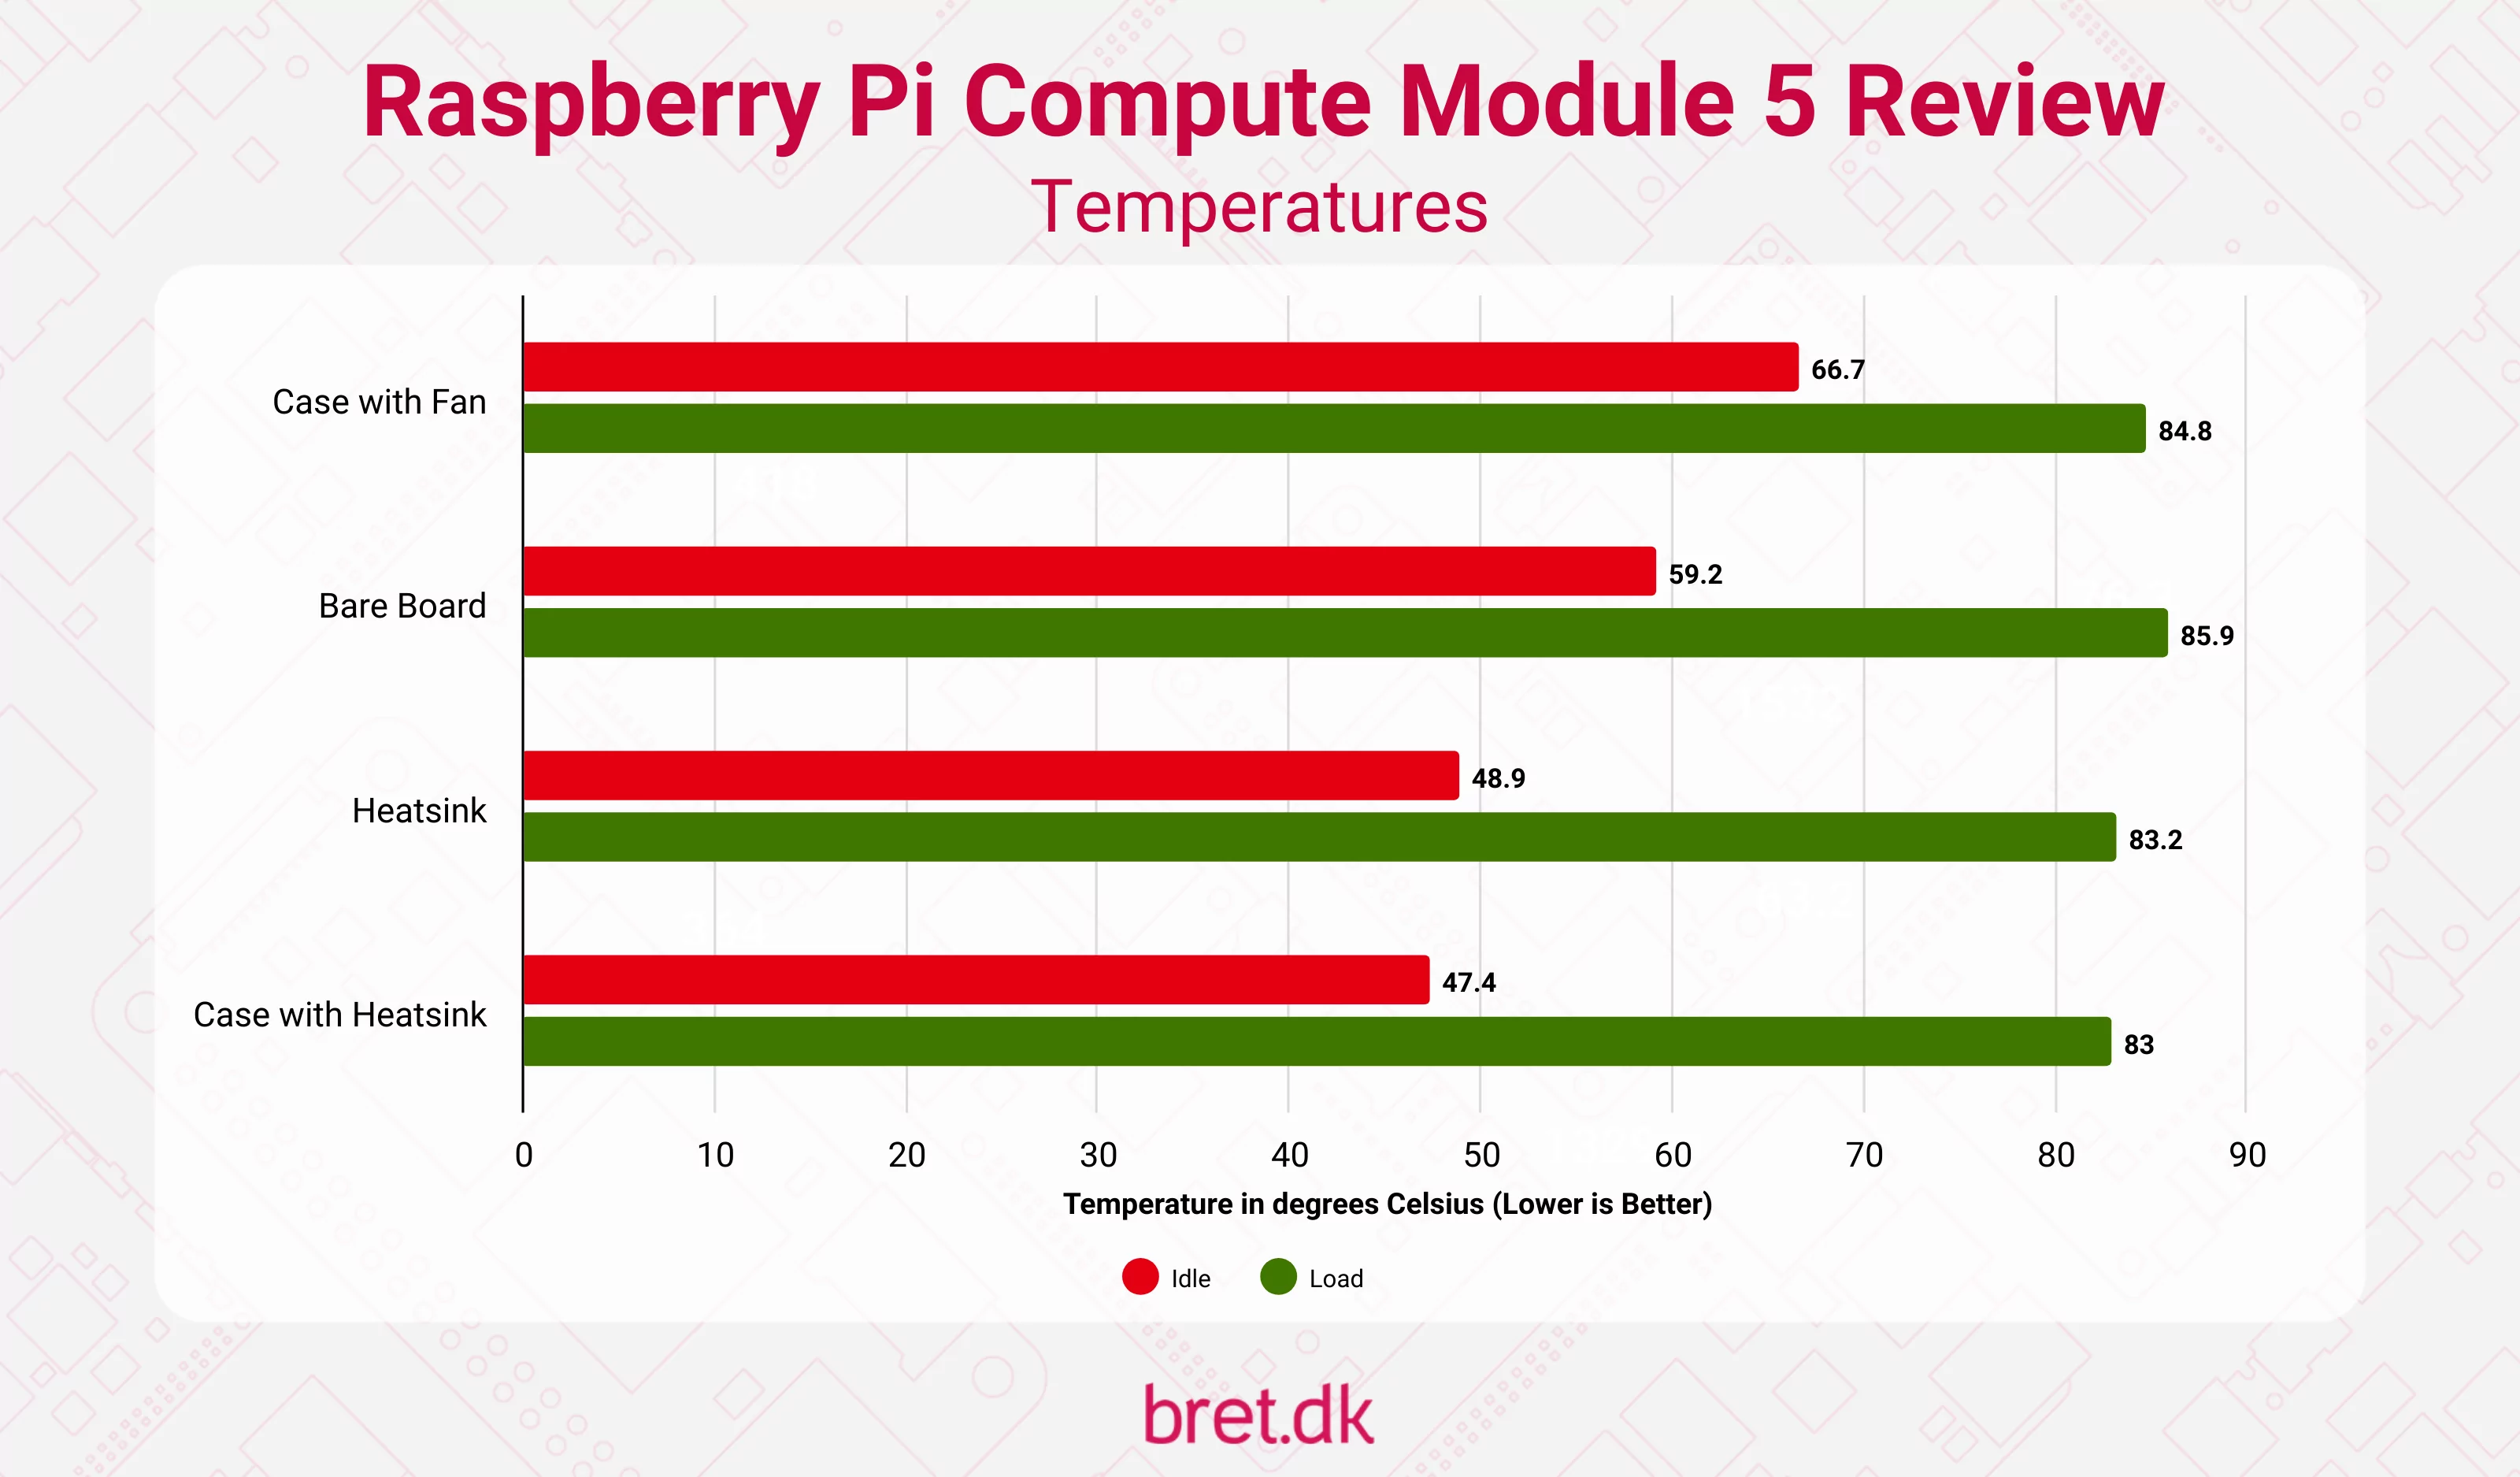
For those curious, “Case with Fan” began throttling after 12 seconds and was down to the minimum 1.5GHz after 27. The “Bare Board” after 15s, hitting 1.5GHz after 28. “Heatsink” fared considerably better, only throttling after 11m20s, and “Case with Heatsink” after 12m29s. In those final two, neither got anywhere near the 1.5GHz when fully throttled, hovering around 2146MHz.
Power Consumption
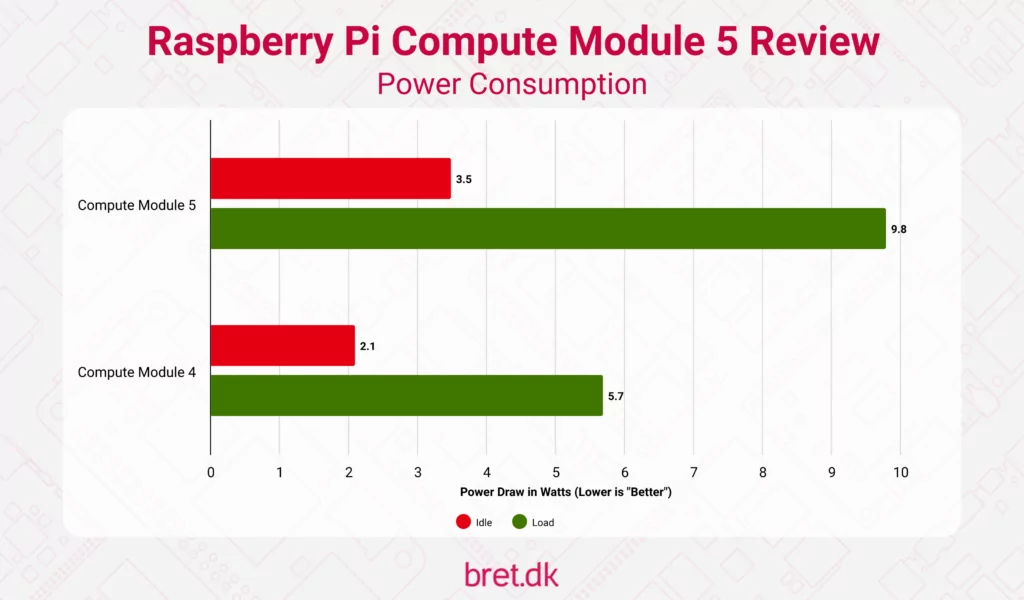
Comparing the CM5 to the CM4 in terms of power consumption feels a little mean given the jumps but I’ve done it anyway. Both were on their respective IO Boards with Ethernet and 1 HDMI display plugged in.
IO Board / Accessories / Kits
With the launch of the Compute Module 5, we also received some 1st party accessories in addition to a new IO Board for mounting this generation of Compute Module, so let’s delv.. I mean, let’s take a quick look through each of those. There’s also a Compute Module 5 Development Kit on the loose where you get everything you’d need to get up and running.
Compute Module 5 IO Board
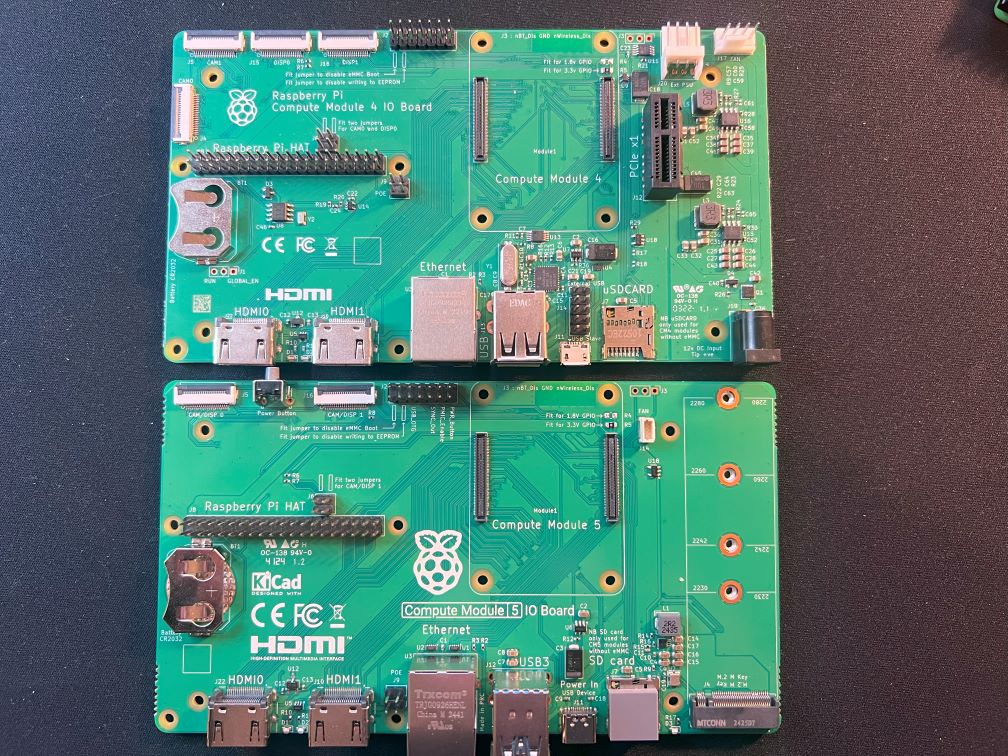
Whilst it looks fairly similar in terms of size, there are some key differences on the CM5 version of the IO Board. 4 separate CSI/DSI connections are condensed into 2 combo ports that can be set to either. PCIe makes way for M.2, and we get the same 4-pin PWM fan header as the Raspberry Pi 5. Oh, there’s a power button too!
Compute Module 5 IO Board Enclosure
As was teased previously, the IO Board enclosure/case is real and feels quite nice. All of the I/O is available and the manufacturing tolerances are good, there are no gaps between the connectors and the case, and the finish on it is good. If you go for a WiFi antenna, there’s a nice hole at the front for the official Raspberry Pi Antenna to go through, and when not in use, it has a rubber grommet to prevent dust and whatever else from creeping in.

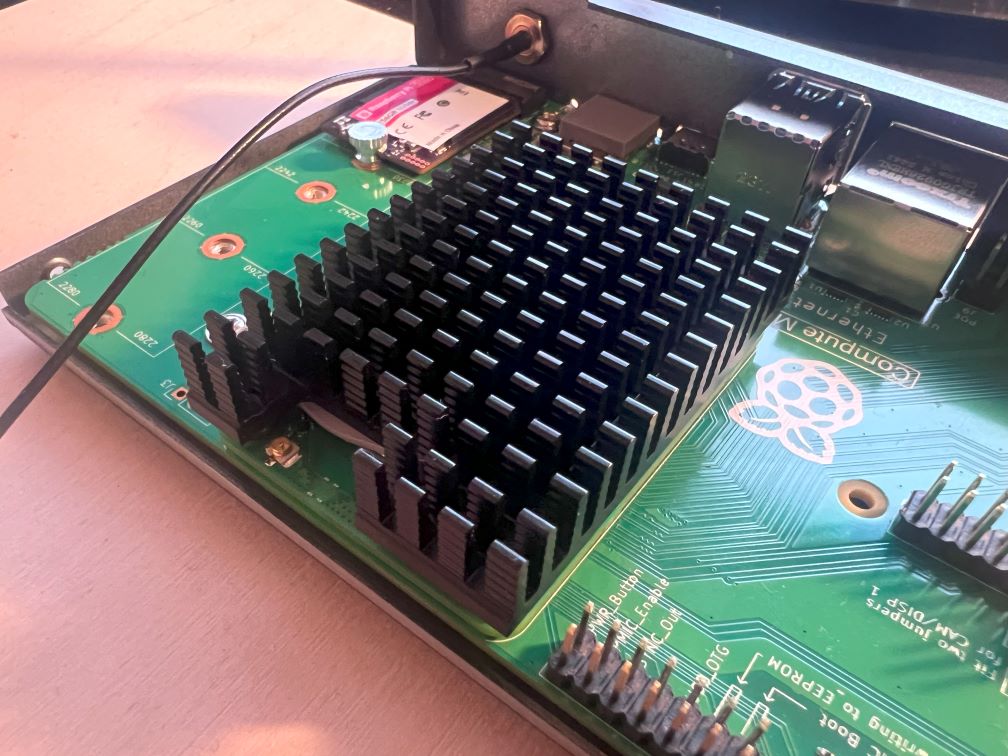
There’s also plenty of ventilation around the front and sides, which is useful if you’re pairing it with the official heatsink, as you will need to remove the fan included in the enclosure (it’s the same fan you get in the Official Pi 5 Case) to be able to fit the heatsink in. Aaaand speaking of the heatsink..
Computer Module 5 Heatsink
Simple and to the point, we have a passive heatsink, that as you can see above in the test data, does a decent job of keeping everything under control, even with the fan removed from the IO. Unless you are running this at 100% in an incredibly warm ambient temperature 24/7, it’s likely going to be sufficient to keep things under control, though some airflow won’t hurt.
Compute Module 5 Development Kit
For those who want everything in one fell sweep (Christmas is coming up, guys, let’s make the graph go up!) we have the CM5 Development Kit containing everything you need, which is as follows:
- Compute Module 5
- Compute Module 5 IO Board
- Compute Module 5 IO Board Enclosure
- Compute Module 5 Heatsink
- 5V5A Power Supply
- 2x HDMI to HDMI Cables
- 1x USB-A to USB-C Cable
- 1x WiFi Antenna
The IO Board is pre-installed in the enclosure in this kit, which is good and bad depending on how you look at it. Good because it saves you some steps, but also bad because if you want to use the heatsink you have to unscrew everything to attach it through the IO Board. Little things I guess.
CM5 Pricing & Availability
So, whilst my memory of the CM4 pricing is a bit hazy, it would seem that it launched at $25 for the 1GB Lite model (no eMMC, no WiFi), however, the product brief was updated in April 2024 to amend that to $30.
Pricing for the CM5 looks to have followed a similar price increase to the Raspberry Pi 5 compared to previous options, with the new lowest specced option being the 2GB Lite model starting at $45. Considering the RAM being doubled, the price feels reasonable!
The CM5 development kit should be available from most resellers, and that’s priced at $130which might be a good option for those who want to get everything in one go and don’t currently have anything. If you have power supplies and cables hanging about, buying the CM5 and specific accessories may work out better for you.
As for where to purchase, I’ll likely be grabbing my additional SKUs from The Pi Hut (not affiliated or sponsored in any way, they’re just from my home county..) whilst I’m back in the UK for Christmas but the Compute Module 5 Product Page will have a list of all of the approved resellers that will be stocking it. Given that there are 32 models available, it may take a while for all resellers globally to get stock in place, and they may not all have the specific one that you’re after. If that’s the case, ask your preferred reseller very kindly! Or look for an alternative..
Conclusion
I don’t think we’re getting any big surprises here. We all know what the Pi X to CM X transformation looks like, and we’ve been drip-fed tidbits of information over the last month or so so we knew what was coming.
That said, the CM5 will be a big upgrade for those wanting more power (with the ability to cool said power) for their projects. The introduction of the official accessories is nice, and whilst I don’t think the Raspberry Pi IO Board is going to be what most people are going to be interested in long-term, having an enclosure for it is nice, and the addition of M.2 may just make people think “Ah screw it, it covers everything I need”.
3rd-party carrier boards is likely going to be where the party’s at and we’re going to see an absolute explosion of options in the coming months, covering every possible use case and I’m most definitely here for it. I know first-hand that Pineboards have some cool stuff in the works and I’m excited for you to see them!
With it not being a fully pin-compatible drop-in replacement, some may hesitate but with the imminent arrival of plentiful accessories, a swap across shouldn’t be too painful, and with Raspberry Pi OS being compatible across all boards in the family, you’ll have minimal migration pains.
Strap in, the news posts and project ideas are coming.
9 comments
There’s no 8GB eMMC. And you probably want to add the 64GB eMMC option.
Nice write-up!
D’oh! Too much data, too late at night. Thanks! :D
what happened to my lanes?? haha
They’re on the motorway
Is the power supply in the development kit the Raspberry 5 power supply with 27W and 5.1V? I’m asking because the CM5 module always mentions 5V.
Yup, it’s just the same Pi 5 5.1V/5A USB-C PSU in the development kit!
Thank you Bret for this quick information
New to Pi ecosystem. Is there any benefit to CM5 over Pi5 other than increased modularity of CM5 (if it is even the case)?
Also it looks to me like CM5 is using the same SOC so why it seems that passive cooling is fine here when for PI5 active is recommended everywhere?
I am trying to setup a single HDD torrent client server using either CM5 or Pi5 and I wonder which of the two would be better suited. Over time I would probably add Sonarr, Radarr and few other like it. Would CM5 with passive cooling be enough for that needs or would I need active cooling in your view and which would be better CM5 or Pi5?
I like the case for CM5 better than what PI5 looks like… :)
The CM5 is more or less using the same SoC, in the sense that it’s a newer revision that’s had around 30% of the “dark silicon” removed, so unnecessary components like the ethernet controller (that’s handled by the RP1 chip) have been taken out and there was a reduction in power draw/temperatures as a result. I’d still recommend some kind of active cooling, especially in a case (as evidenced by RPi having a fan in their own case) depending on how heavy you’re planning to hit it. Torrents can tend to chew up CPU with encryption/decryption and decompression so you’ll have to see how it goes :D