The Waveshare Raspberry Pi USB/Ethernet Hub Hat is a small, ready to go expansion board for Raspberry Pi Single Board Computers that takes your GPIO headers and Micro USB data connection and extends it to 3 USB2.0/1.1 ports and a 10/100Mbit Ethernet port.
The question is, is it worth it? What kind of speeds can you expect to see from it? Through a series of tests, hopefully, I can let you know!
Disclaimer: There are Amazon and AliExpress affiliate links in this post that may result in me earning a small commission if you click and purchase any items.
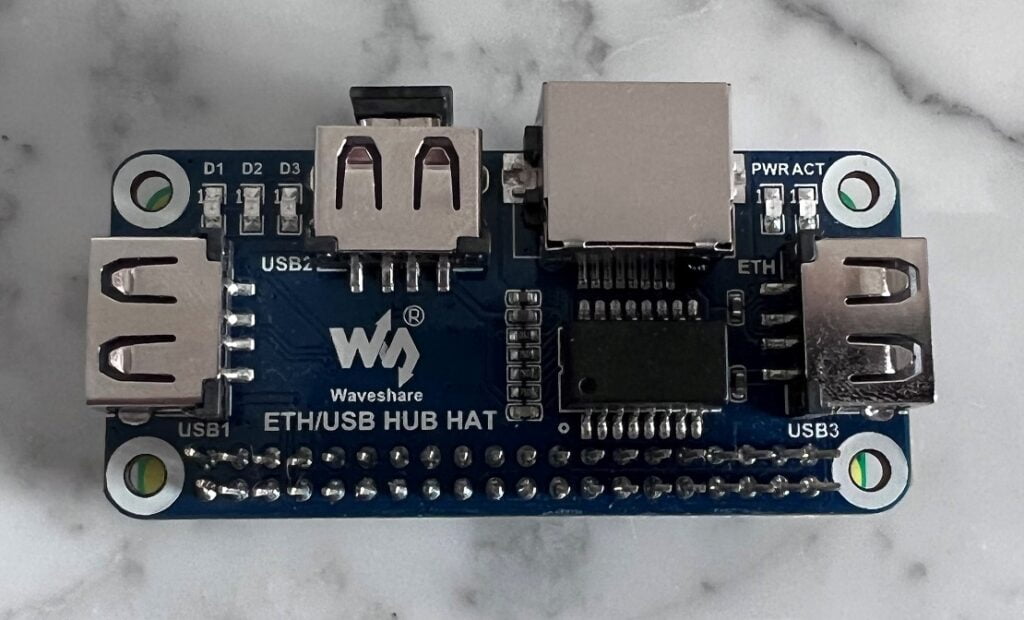
Table of Contents
Specifications & Information
- Compatible with Raspberry Pi Zero W & Zero 2 W via included Micro USB bridge
- Compatible with Raspberry Pi B+, 2B, 3B, 3B+ & 4B via Micro USB cable (not included)
- Requires male GPIO headers to be present for connection (passed-through male headers are available on top of the hat)
- Terminus FE1.1s USB2.0/1.1 Hub Chip
- Realtek RTL8152B 10/100M Ethernet Chip
- TS7121A Network Port Filter
- LED indicators are available for power (PWR), ethernet (ACT) and each USB port (D1-3) individually
The board came well packaged in a sturdy cardboard box with padding material inside preventing the item from being thrown around inside the box. In addition, there was a foam piece inserted on top of the GPIO pins to prevent those from being bent or piercing the bag. Overall, the packaging was great, thumbs up, Waveshare!
Installation was quick and easy. You simply line up the post screws and push the Hat down onto your Pi’s GPIO pins. Once in place, screw the 2 posts in, attach the Micro USB bridge and you’re good to go.
The hat on top of the Pi Zero doesn’t stick out too much at all, they have near enough the same footprint which is nice, though it won’t fit in any standard cases or the Zero, though this is not a problem for me. The USB and Ethernet ports feel sturdy and overall, the board feels well made. Individual activity lights for power, ethernet and each USB port are a great touch too! If I had to nitpick about anything; the USB ports on my unit take quite a bit of force to plug into and I felt a little uneasy at first but I’m sure after a while this will get a bit easier.
The eagle-eyed among you may also see the bent pins in the photo above. They’re a little longer than the ones that come with the Raspberry Pi and seem to be a slightly softer material so bend quite easily. This does also mean that they bend back easily enough, though I wonder how many bends back and forth they’ll take before breaking.
The Results
USB-attached SSD
USB Gigabit Ethernet Adapter
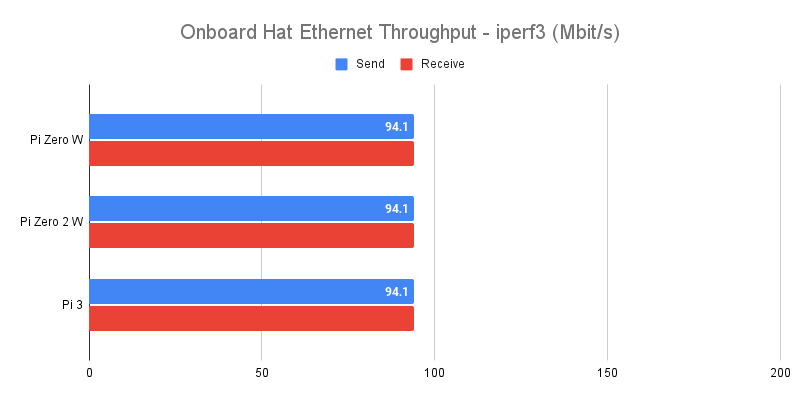
Onboard Ethernet Adapter
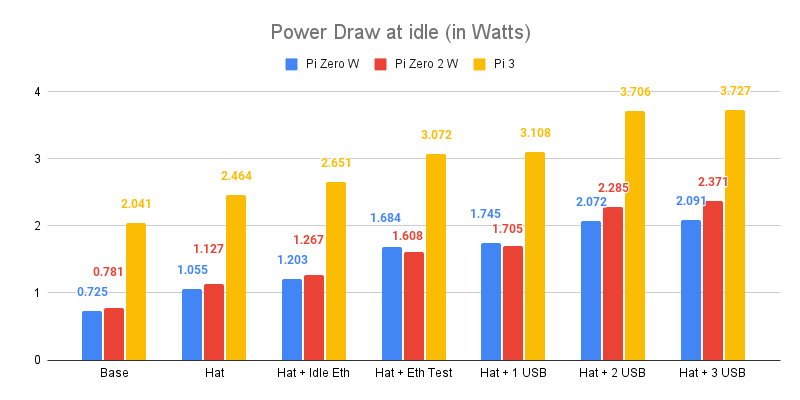
Power Usage
Post-Testing Thoughts
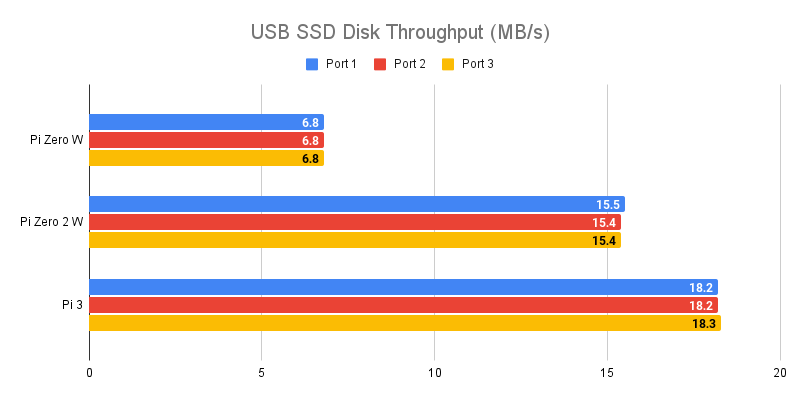
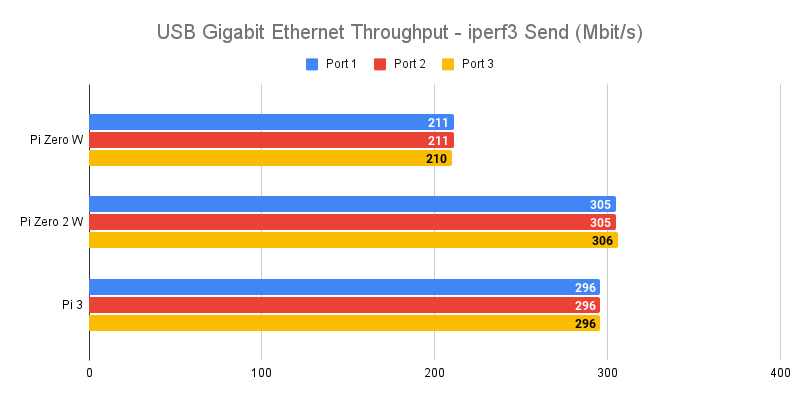
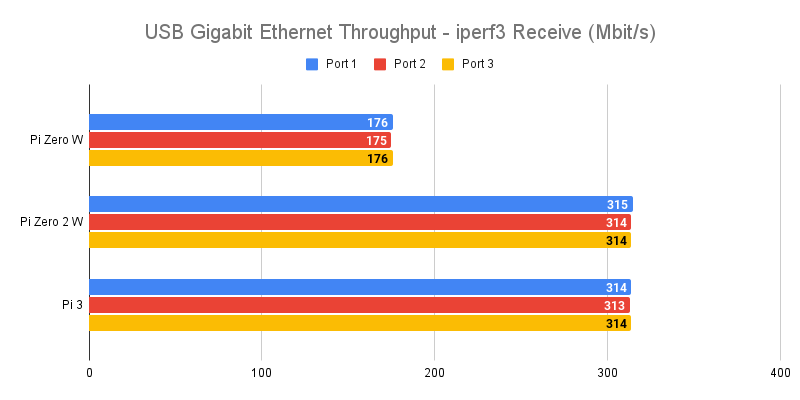
Whilst there’s a little deviation in the results, it’s largely within a margin of error (or identical in the case of the onboard ethernet) which is all to be expected. The USB performance is roughly in line with what I saw with my Pi Zero W / 2 comparison and benchmark and with the right hardware it could be a nice addition to a smaller Pi that needs additional IO.
Realistically this hat is made for the Pi Zeroes though and it matches the footprint very well whilst adding 3 full-size USB-A ports, along with a 100Mbit RJ45 ethernet port. It’s not going to set the world on fire but if you want to run a PiHole over ethernet instead of WiFi, the slower throughput will make little difference.
I really wouldn’t recommend installing this on something like the Pi 3 as it was very awkward to reach USB port 3 and it already has a faster, more capable ethernet port (even if it does share bandwidth).
Testing Methodology
To test the Waveshare USB/Ethernet Pi Hat I performed the following tests:
- 50 Sequential Read Tests (using a USB attached Samsung EVO 850 SSD)
- 5 minute iperf3 run in both directions (using a Linksys Gigabit USB Ethernet adaptor)
- 5 minute iperf3 run in both directions with the onboard ethernet port
I’ve also shared the following (idle and full load) power usage information:
- Raspberry Pi on its own
- Raspberry Pi with the hat attached but no devices
- Raspberry Pi with the hat attached and onboard ethernet being tested
- Raspberry Pi with the hat attached with 1, 2 and 3 USB devices (2 USB flash drives + USB keyboard) connected
There are likely other scenarios that would be interesting but I feel this covers a lot of bases to be somewhat useful. Please leave a comment below if there’s a specific scenario you’d really like me to test and I’ll see what I can do. The 3 USB devices in the power usage test were a SanDisk Ultra Fit 32GB (always in port 1), SanDisk Ultra 64GB (in port 2) and a Logitech K120 USB Keyboard (in port 3).
The hat does claim to work with all 40-pin GPIO Raspberry Pi boards (and actually some boards from others that support Raspberry Pi’s 40-pin GPIO, we’ll test that when the MangoPi and Radxa Zeroes arrive!) but I’ve chosen to only include the Pi Zero W, Pi Zero W 2 and the Pi 3 in this piece. My reasoning behind this is it covers the 2 boards that the hat fits perfectly (and thus you’re more likely to be interested in) along with a full-size Pi 3 board to see if anything interesting happens there.
As always, I had a 120mm fan blowing air across the board/hat to ensure overheating/throttling doesn’t impact testing.