I know I said that I was going to cool it (hehe) on the Pi 5 cooler front but after seeing the ICE Tower Plus pop up in stores, I had questions. First of all, why? Second, why is it now in my basket and paid for?
I previously reviewed the Raspberry Pi 4 ICE Tower and the updated Raspberry Pi 5 ICE Towers and they performed very well. The latter on the Pi 5 prevents all thermal throttling (you don’t even need to strap a Delta fan to it) so you’d think that’s case closed, right?
Not for 52pi, who with their infinite wisdom have decided “bigger is better” and graced us with their latest creation, the ICE Tower Plus.

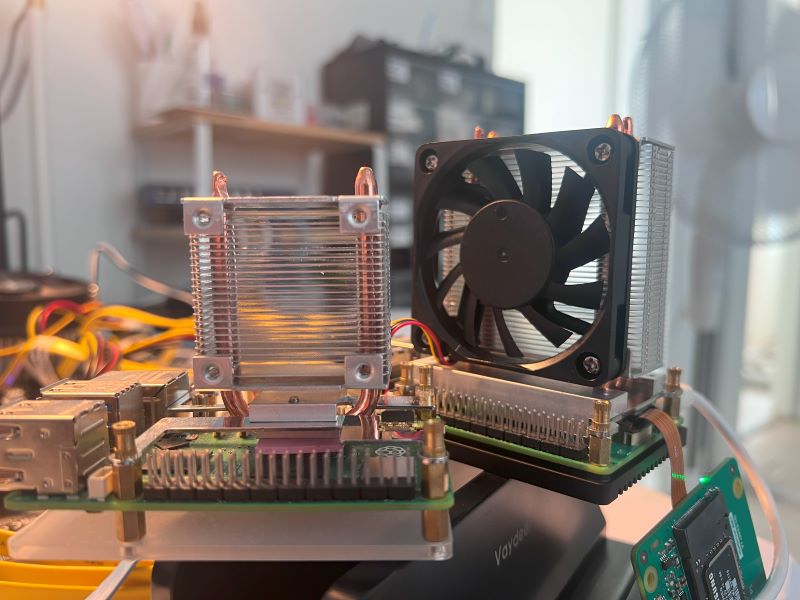
When you first look at the upgraded Plus version of the ICE Tower, there are a couple of differences. On the original, there was simply contact on the SoC itself and that handled everything cooling-wise.
On the Plus, we have additional contact with the top of the board thanks to a larger contact block, and then another aluminium block on the bottom that features more or less a full Pi-sized thermal pad.
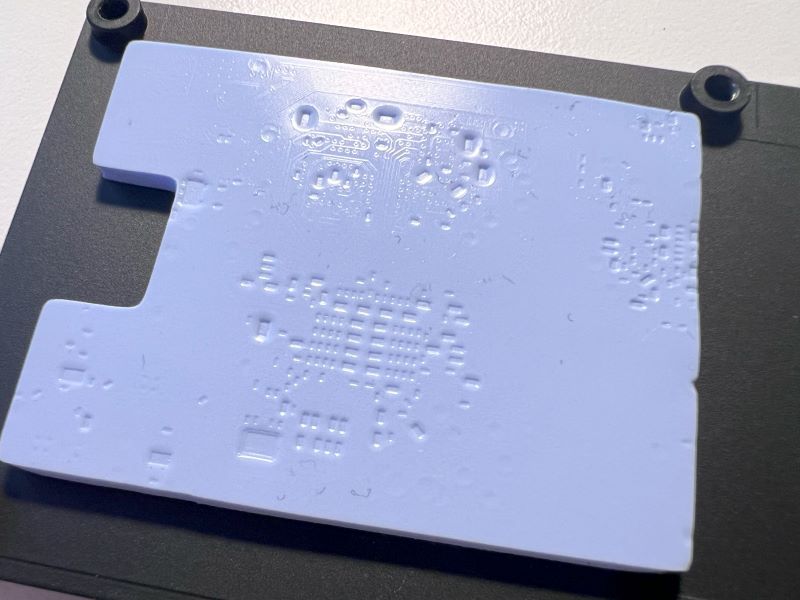
With those additions, I wonder if the increase in tower/fan size was really necessary. Well, it wasn’t, given that the original handled things just fine, even on the performance governor but let’s get to testing and see what the numbers tell us.
Table of Contents
Assembly & What’s In The Box?
I won’t walk you through the steps in this section as the product comes with a detailed booklet explaining how to do so, though assembly was straightforward.
There’s a little more to the ICE Tower Plus compared to its smaller cousin with the base plate but the all-metal screws and spacers fit together perfectly with a good amount of mounting pressure on both sides with a 1.5mm thermal pad on the SoC, and a 2mm pad on the base plate.
On the subject of thermal pads, you receive 2 spare SoC pads which is great, along with spare screws of each kind, a hex/allen key, and a mini screwdriver.
Performance Testing
Testing Methodology
Before we get into the data, it’s probably best I tell you how we’re testing this. For idle temperatures, I’m booting into Raspberry Pi OS Lite and leaving it for 30 minutes to normalise. For load temperatures, stress-ng is used with –matrix 0 –cpu 0 to give the SoC a real hammering. The performance CPU governor was also in play, so the Pi 5 is running at 2.4GHz at all times so on the default ondemand, your numbers may differ. This is supposed to be a worst-case scenario. All tests were performed with an ambient temperature of 25 degrees Celsius.
Raspberry Pi 5 Cooler Comparison
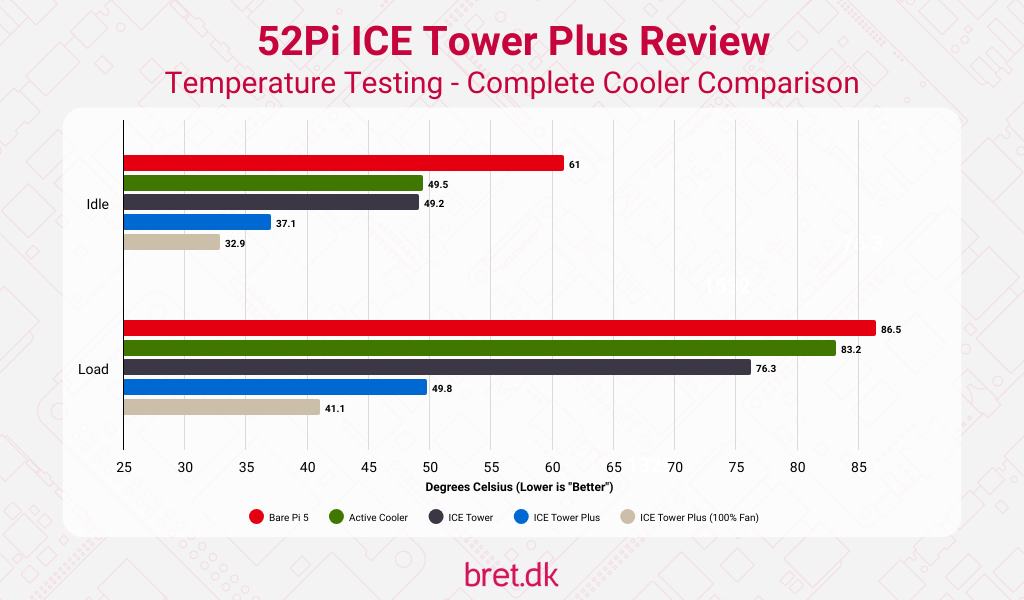
The first graph is a straight comparison of the ICE Tower Plus against various official Raspberry Pi cooling options and the original Raspberry Pi 5 ICE Tower cooler.
Under full load, the fan on the ICE Tower Plus only spins up periodically to keep things hovering around 49-50c so I’ve included an extra line for the fan on 100% just to see what it’s actually capable of.
ICE Tower Plus – Individual Component Testing
In addition, however, I wanted to test each new piece of the ICE Tower to see how much of an impact they’re having as before I received the ICE Tower Plus I was wondering just how useful that base plate would be and it got me thinking.
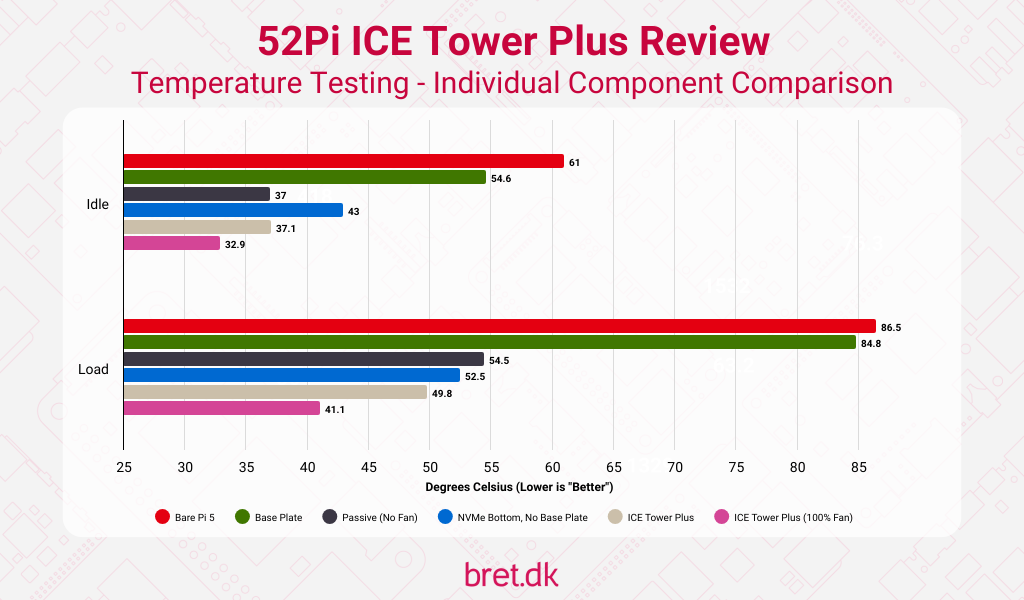
As you can see, I owe the base plate an apology. I’m sorry, I wasn’t familiar with your game. It does a lot of heavy lifting thanks to it being a hefty chunk of metal and a large thermal pad doing its best to shift heat away. It took almost 2 minutes for the Pi 5’s SoC to begin throttling with the base plate alone.
Finally, whilst I was trying to wrap up this review I had the idea to include an option for those that still wanted to use an NVMe drive with the ICE Tower Plus. You’ll see the blue “NVMe Bottom, No Base Plate” option in the graph above and that’s exactly what it sounds like. To enable the use of a bottom-mounted NVMe add-on board you realistically have to remove the base plate and that’s how I tested things above. There’s a decent jump in temperatures there when compared to using the base plate but you’re still well within what I’d call acceptable temperatures.
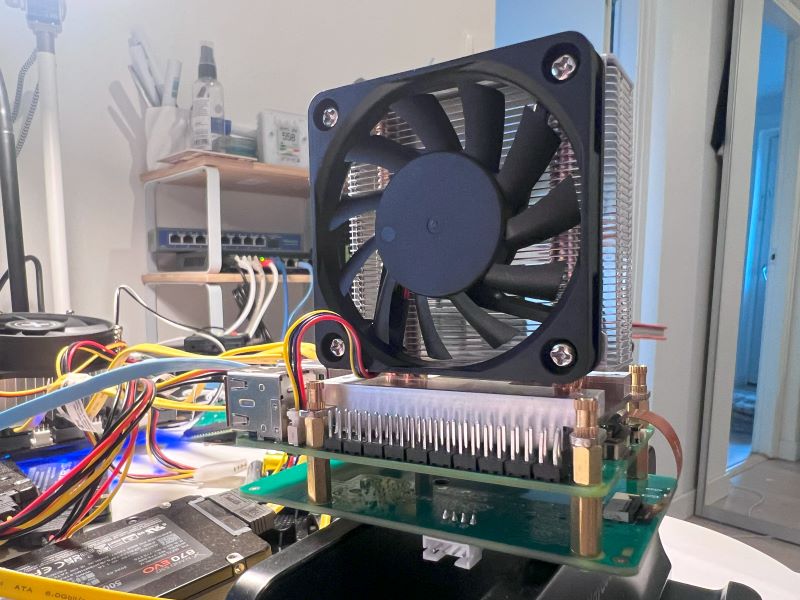
If you did want to go one step further and find the right combination of screws, you could probably still use the base plate and have 3-4 sets of spacers separating everything but you don’t need to do this for thermal reasons. If you do go crazy and try it, however, please send me a photo.
Where can I buy the ICE Tower Plus?
Given that this is a relatively new product, it’s nice to see that it’s already made its way to international distributors and on various Amazon storefronts so most people should have no problem finding one somewhat locally.
Priced at $18.99 RRP on the official 52Pi store, we see prices are, on large, fairly close to that with distributors (once you factor in sales tax etc) so for the amount of cooling performance you get, it’s quite the deal.
| Retailer | Price | Purchase Link |
|---|---|---|
| Amazon (US/CA/MX/IN) | $19.99 USD | Buy on Amazon* |
| Amazon (EU/UK/JP+) | EUR 23.99 (in DE) | Buy on Amazon* |
| AliExpress | USD 19.99 | Buy on AliExpress* |
| 52Pi | USD 18.99 | Buy on 52Pi |
Conclusion
ICE Tower Plus – The Bad
The obvious downside here is that by using this cooler, you’re making it impossible to use a lot of the HATs available on the market. Access to the Power over Ethernet (PoE) headers and GPIO is also made a little difficult but I imagine this cooler is going to appeal more to users that don’t care so much about that.
The same goes for cases for your Raspberry Pi. It’s just not going to happen, and you’re probably OK with that.
Could you also class it as being overkill in more or less every situation a bad thing?
ICE Tower Plus – The Good
There’s no doubt that this cooler offers incredible cooling performance. If you like the aesthetic, have the space, or perhaps live in a much warmer climate, it will be a great option to keep temperatures under control. The 60x10mm fan isn’t particularly audible, especially as it’s rarely spinning up. Even at 100% it’s not unbearable.
The pricing is also, in my opinion, very reasonable and for those of you who want something just to set and forget, perhaps whilst playing around with AI LLMs or other heavy tasks, you may have just found the best cooling solution.
All in all, I’d recommend the product. It does what it should and it does it very well. I’ll still be curious about what specific use case this has over the original, but hey, it is what it is.
8 comments
Hello. Can i use the cooler with thermal paste?
Hi! It doesn’t look like it would work, really. There’s a 1.5mm thermal pad on there and the spacers/screws are configured for that. With the performance of the cooler as it is, I probably wouldn’t bother too much, unless you want to just for the fun of it :D
The thickness of the thermal pad might explain the poor performance of this silly monstrosity of a ‘cooler’.
Running passively cooled (in an enclosure that acts like a heatsink – see 2nd link below for a picture) also with ‘stress-ng –matrix 0 –cpu 0’ I end up with ~73°C after half an hour though ambient temp 1.3°C lower than your test setup: https://0x0.st/Xqo_.txt
This is a setup for less than 11 bucks. And by adding the cheapest fan possible to it we’re at 12 bucks and even at 3000 MHz we’re not exceeding 40°C at 25°C ambient: https://www.cnx-software.com/2024/01/26/52pi-water-cooling-kit-raspberry-pi-5-sbc-3-ghz/#comment-614864
We throw these SBC in similar ‘passive cooling enclosures’ usually behind some server’s fan exhausts and this works very well since all the setup has to achieve is prevent thermal throttling / exceed 80°C
I recently received the Argon40 THRML 60mm cooler that’s very similar, albeit with thermal paste instead of a thermal pad so I’ll be curious to see if there’s any difference between the two. I completely agree though, these coolers really don’t need to exist but I guess if you’re into the aesthetic and people are buying them then who am I to judge :D
Thx, i will give it a shot.
To avoid these crappy thermal pads (see also https://www.jeffgeerling.com/comment/33479#comment-33479) I ordered a bunch of copper shims of various thickness years ago. Those combined with two small amounts of thermal paste usually work way better :)
i will check this out. I get the cooler tomorrow then i will measure the gap. Maybe paste is sufficient.
i managed it to use thermal paste without a copper shim. Here is my cheap and easy “mod”. You will need 4 nuts with 2mm Height.
https://ibb.co/Ln2XfV2
Temperation is fine